 English
 Magyar
 Deutsch



If you connect to multiple servers, you’ll soon tire of commands such as ssh -p 2222 -i ~/.ssh/id_ed25519_web janos@203.0.113.10. In the SSH client’s configuration file, ~/.ssh/config, you can assign a short name to each server, along with its address, username, port and key, and from then on, all you need to do is type ssh web1. The same name also works with the scp, rsync, sftp and git commands.
The examples in this article were tested in November 2026: as clients, we used an AlmaLinux 10.2 virtual machine (OpenSSH 9.9) and macOS (OpenSSH 10.3); as servers, we connected to machines running Debian 13 (OpenSSH 10.0) and AlmaLinux 10.2. The settings need to be configured on your own machine (laptop, desktop), not on the server; they can be used in exactly the same way for a Linux VPS.
Where is the file?
| System | Personal settings | For all users |
|---|---|---|
| Linux, macOS | ~/.ssh/config |
/etc/ssh/ssh_config |
| Windows 10 and 11 (built-in OpenSSH) | C:\Users\<name>\.ssh\config |
C:\ProgramData\ssh\ssh_config |
The file does not exist by default; you will need to create it yourself. The Windows paths are as specified in Microsoft’s documentation; save the file there without an extension (config, not config.txt).
Do not confuse this with the server’s configuration file: the /etc/ssh/sshd_config (with the letter d) on the server controls who can log in and how. This is covered in the article on SSH server security settings; the basics of SSH are explained in the article on Linux Secure Shell (SSH).
The first entry
Create the directory and file with the appropriate permissions:
mkdir -p ~/.ssh
chmod 700 ~/.ssh
touch ~/.ssh/config
chmod 600 ~/.ssh/config
nano ~/.ssh/config
Registering a server:
Host web1
    HostName 203.0.113.10
    Port 2222
    User janos
    IdentityFile ~/.ssh/id_ed25519_web
    IdentitiesOnly yes
After saving, the connection:
ssh web1
This does exactly the same as ssh -p 2222 -i ~/.ssh/id_ed25519_web janos@203.0.113.10. Indenting the lines following the Host line is not mandatory; it simply makes the file easier to read. The entry continues until the next Host line.
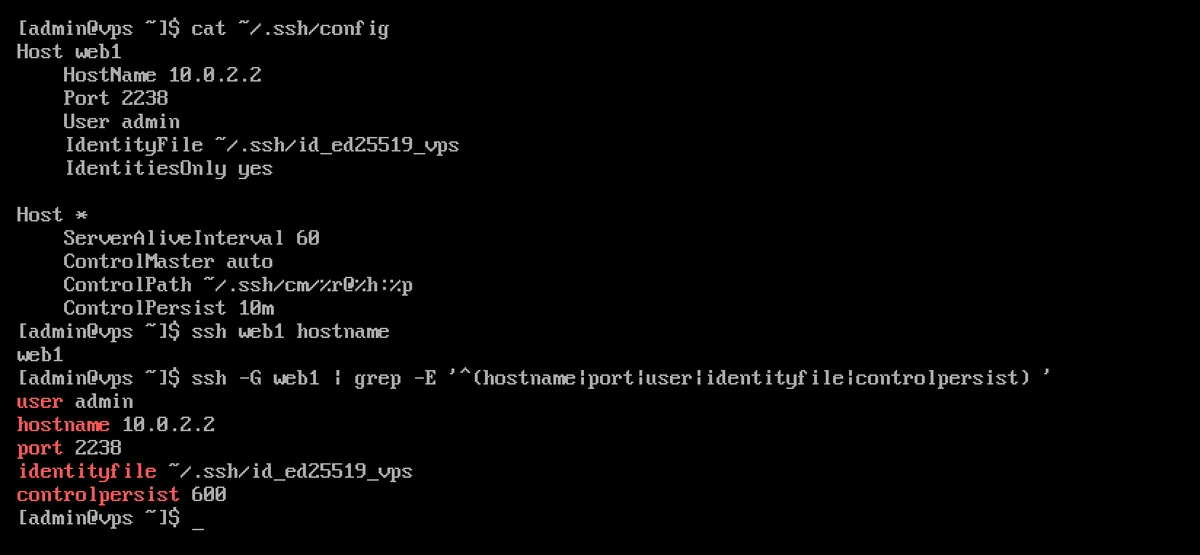
The most common settings
| Settings | What is it for? | Command-line equivalent |
|---|---|---|
Host |
The short name (or pattern) to which the entry refers | |
HostName |
The server’s actual address or IP address | |
User |
Username | -l janos or janos@ |
Port |
The SSH port, if not 22 | -p 2222 |
IdentityFile |
The private key file | -i ~/.ssh/kulcs |
IdentitiesOnly yes |
Only try the key provided | |
ServerAliveInterval |
Send a status update every second | -o ServerAliveInterval=60 |
ProxyJump |
Connecting via an intermediate machine | -J bastion |
LocalForward |
Local port forwarding | -L 8080:127.0.0.1:80 |
DynamicForward |
SOCKS proxy | -D 1080 |
ControlMaster, ControlPath, ControlPersist |
Sharing a connection across multiple sessions |
Settings are case-insensitive (hostname and HostName are the same). The full list can be viewed using the man ssh_config command.
Keys: IdentityFile and IdentitiesOnly
If you have multiple keys, the IdentityFile specifies which one the client uses for the given server. Without IdentitiesOnly yes, the client will first try the keys stored in the SSH agent (ssh-agent) with the default names (~/.ssh/id_ed25519, ~/.ssh/id_rsa, etc.). If there are many keys, the server may terminate the connection with the Too many authentication failures error before the correct key is found, as it limits the number of failed attempts.
Host github.com
    User git
    IdentityFile ~/.ssh/id_ed25519_github
    IdentitiesOnly yes
You can generate a key pair using the command ssh-keygen -t ed25519 -f ~/.ssh/id_ed25519_web, and copy the public key using the command ssh-copy-id -i ~/.ssh/id_ed25519_web.pub web1. The steps for setting up key-based authentication are outlined in the article How do I connect to my VPS via SSH?.
Patterns and order: the first match wins
After Host, you can specify multiple names and patterns: * represents any sequence of characters, ? represents a single character, and ! excludes.
Host web1
    HostName 203.0.113.10

Host web2
    HostName 203.0.113.11

# For every host whose name starts with web
Host web*
    User deploy
    Port 2222

# For every host except the old server
Host * !regi-szerver
    ServerAliveInterval 60
The client reads the file from top to bottom and uses the first value found for each setting; subsequent blocks that also match do not overwrite the same setting, but only fill in the values that have not yet been specified. In the example above, web1 obtains the address from its own block, the user and port from the web* block, and the heartbeat from the Host * block.
This leads to the most important rule: the general Host * block must be placed at the end of the file. In the test, by placing a Host * block containing the line User root at the beginning of the file, web1 was also assigned the root user, even though its own block specified User admin.
Commands entered at the command line override everything else: the command ssh -l janos web1 connects using the janos user, regardless of the file.
Keepalive: prevent idle connections from being terminated
If the connection is terminated with a Broken pipe or Connection reset error after a few minutes of inactivity, this is usually caused by a router or firewall terminating connections with no traffic. The ServerAliveInterval sends a heartbeat over the encrypted channel every specified number of seconds, so that the connection does not appear to be idle:
Host *
    ServerAliveInterval 60
    ServerAliveCountMax 3
ServerAliveCountMax 3 means that after three unanswered heartbeats (in this case, approximately three minutes), the client terminates the connection, so even if a server has genuinely become unreachable, the terminal will not remain frozen indefinitely.
ProxyJump: connecting via an intermediary server
If a server cannot be accessed directly from the internet, but only via an intermediate machine (bastion, jump host), ProxyJump will route you through it in a single step:
Host bastion
    HostName bastion.pelda.hu
    User janos
    IdentityFile ~/.ssh/id_ed25519_web

Host belso
    HostName 10.0.0.5
    User janos
    IdentityFile ~/.ssh/id_ed25519_web
    ProxyJump bastion
The ssh belso first connects to the bastion machine, then opens an encrypted channel through it to port 22 on the internal machine. You log in to both machines from your own machine using your own key: the private key is not transferred to the intermediate machine, and ForwardAgent is not required.
In the test, the macOS client accessed a Debian 13 machine via an AlmaLinux 10.2 machine, the address of which was not directly accessible from the client (ssh -o ProxyJump=none belso returned an error due to a timeout). The output of ssh -v belso also shows the intermediate step (the addresses have been adapted to the example above):
debug1: Setting implicit ProxyCommand from ProxyJump: ssh -v -W '[%h]:%p' bastion
Authenticated to bastion.pelda.hu ([203.0.113.20]:22) using "publickey".
Authenticated to 10.0.0.5 (via proxy) using "publickey".
You can specify multiple intermediate machines separated by commas (e.g. ProxyJump bastion1,bastion2), while for occasional use the -J switch is sufficient: ssh -J bastion janos@10.0.0.5.
Port forwarding: LocalForward and DynamicForward
You can also access a service that runs only on the server locally (at 127.0.0.1) – such as a database or a web-based control panel – from your own computer via an SSH tunnel:
Host web1-alagut
    HostName 203.0.113.10
    User janos
    IdentityFile ~/.ssh/id_ed25519_web
    # Port 8080 on your machine -> 127.0.0.1:8000 on the server
    LocalForward 8080 127.0.0.1:8000
    # SOCKS proxy on port 1080 of your machine
    DynamicForward 1080
# Open the tunnel in the background, without a shell
ssh -f -N web1-alagut

# Port 8000 of the server is now reachable on your machine
curl http://127.0.0.1:8080/
In the test, the client only opened ports 8080 and 1080 on the addresses 127.0.0.1 and ::1, so the other machines on the network could not access them. Both curl http://127.0.0.1:8080/ and curl --socks5-hostname 127.0.0.1:1080 http://localhost:8000/ returned the page of the web server running locally on the server. The use of a SOCKS proxy in a browser is described in the article ‘Setting up an SSH SOCKS proxy on a Linux server’.
You can close the tunnel running in the background by stopping the process, or, if you are also using the shared connection described below, by using the command ssh -O exit web1-alagut.
Shared connection: ControlMaster
If you frequently connect to the same server (e.g. frequent scp, rsync or git operations, or multiple terminal windows), you can keep the first connection open, and subsequent connections will be established via this connection without the need to log in again:
mkdir -p ~/.ssh/cm
chmod 700 ~/.ssh/cm
Host *
    ControlMaster auto
    ControlPath ~/.ssh/cm/%r@%h:%p
    ControlPersist 10m
ControlPath is the socket file for the shared connection (%r is the user, %h is the address, %p is the port), while ControlPersist 10m means that the connection remains open for ten minutes after the last session has been closed. In the test, the first ssh web1 true took 0.13 seconds, while the second, over the shared connection, took 0.006 seconds; on a remote server, using a password key or two-factor authentication, the difference is much greater.
# Fut-e megosztott kapcsolat?
ssh -O check web1

# Close the shared connection
ssh -O exit web1
Sessions launched via the shared connection are terminated along with the main connection. According to the Win32-OpenSSH project description, Windows’ built-in OpenSSH client does not support this feature (we have not tested this); it omits these lines.
Includes: settings in multiple files
If you have a large number of servers, you can also organise the entries into separate files:
Include config.d/*.conf

Host *
    ServerAliveInterval 60
The relative path is relative to the ~/.ssh directory, so the line above reads files ending in .conf from the ~/.ssh/config.d/ directory. Place the Include line at the start of the file, before every Host block: an Include within a Host block is only valid if that block matches. In testing, an Include file following a Host a block for Host bs entry had no effect; placing it at the start of the file made it work.
What will the actual configuration be? ssh -G
If you are unsure which value applies to which block, the command ssh -G will list all the settings actually in use for that name, without establishing a connection:
ssh -G web1 | grep -E '^(hostname|port|user|identityfile|proxyjump) '
This is the best way to identify errors arising from the order of commands or a typo in a command. The steps involved in the actual connection are shown by the command ssh -v web1.
Permissions: “Invalid owner or permissions”
The SSH client refuses to use a configuration file that can be modified by other users. In such cases, it stops with the following error:
Bad owner or permissions on /home/janos/.ssh/config
In the test, this triggered permission code 666, and as the user was also a member of another group in their primary group, permission code 664 was also triggered. The fix:
chmod 600 ~/.ssh/config
chmod 700 ~/.ssh
You should also ensure that you are the owner of the file (chown $USER ~/.ssh/config) if, for example, you edited it using sudo and it ended up belonging to root. For more information on permissions, see: File permissions (chmod, chown) on Linux.
The short name in other programs
The config file is read by all programs based on OpenSSH, so the short name works wherever a server address needs to be specified:
# Copy files
scp mentes.tar.gz web1:/home/janos/
rsync -av ./public/ web1:/var/www/html/
sftp web1

# Git repository on the server
git clone web1:repo.git
Everything worked during the test; however, rsync only worked after we had installed the rsync package on the Debian server as well (it is not included by default in the Debian 13 cloud image, and rsync is required on both sides). The details of file copying are set out in the article Copying files between servers (scp, rsync, sftp).
According to their documentation, the Visual Studio Code Remote - SSH extension also reads the machines from this file (the Host list displays the Host names), as do many graphical SFTP clients and terminal programs.
Full example
Include config.d/*.conf

Host web1
    HostName 203.0.113.10
    User janos
    Port 2222
    IdentityFile ~/.ssh/id_ed25519_web
    IdentitiesOnly yes

Host bastion
    HostName bastion.pelda.hu
    User janos
    IdentityFile ~/.ssh/id_ed25519_web

Host belso
    HostName 10.0.0.5
    User janos
    IdentityFile ~/.ssh/id_ed25519_web
    ProxyJump bastion

Host db-alagut
    HostName 203.0.113.10
    User janos
    Port 2222
    IdentityFile ~/.ssh/id_ed25519_web
    LocalForward 3307 127.0.0.1:3306

# General settings always go at the end
Host *
    ServerAliveInterval 60
    ServerAliveCountMax 3
    ControlMaster auto
    ControlPath ~/.ssh/cm/%r@%h:%p
    ControlPersist 10m