 English
 Magyar
 Deutsch



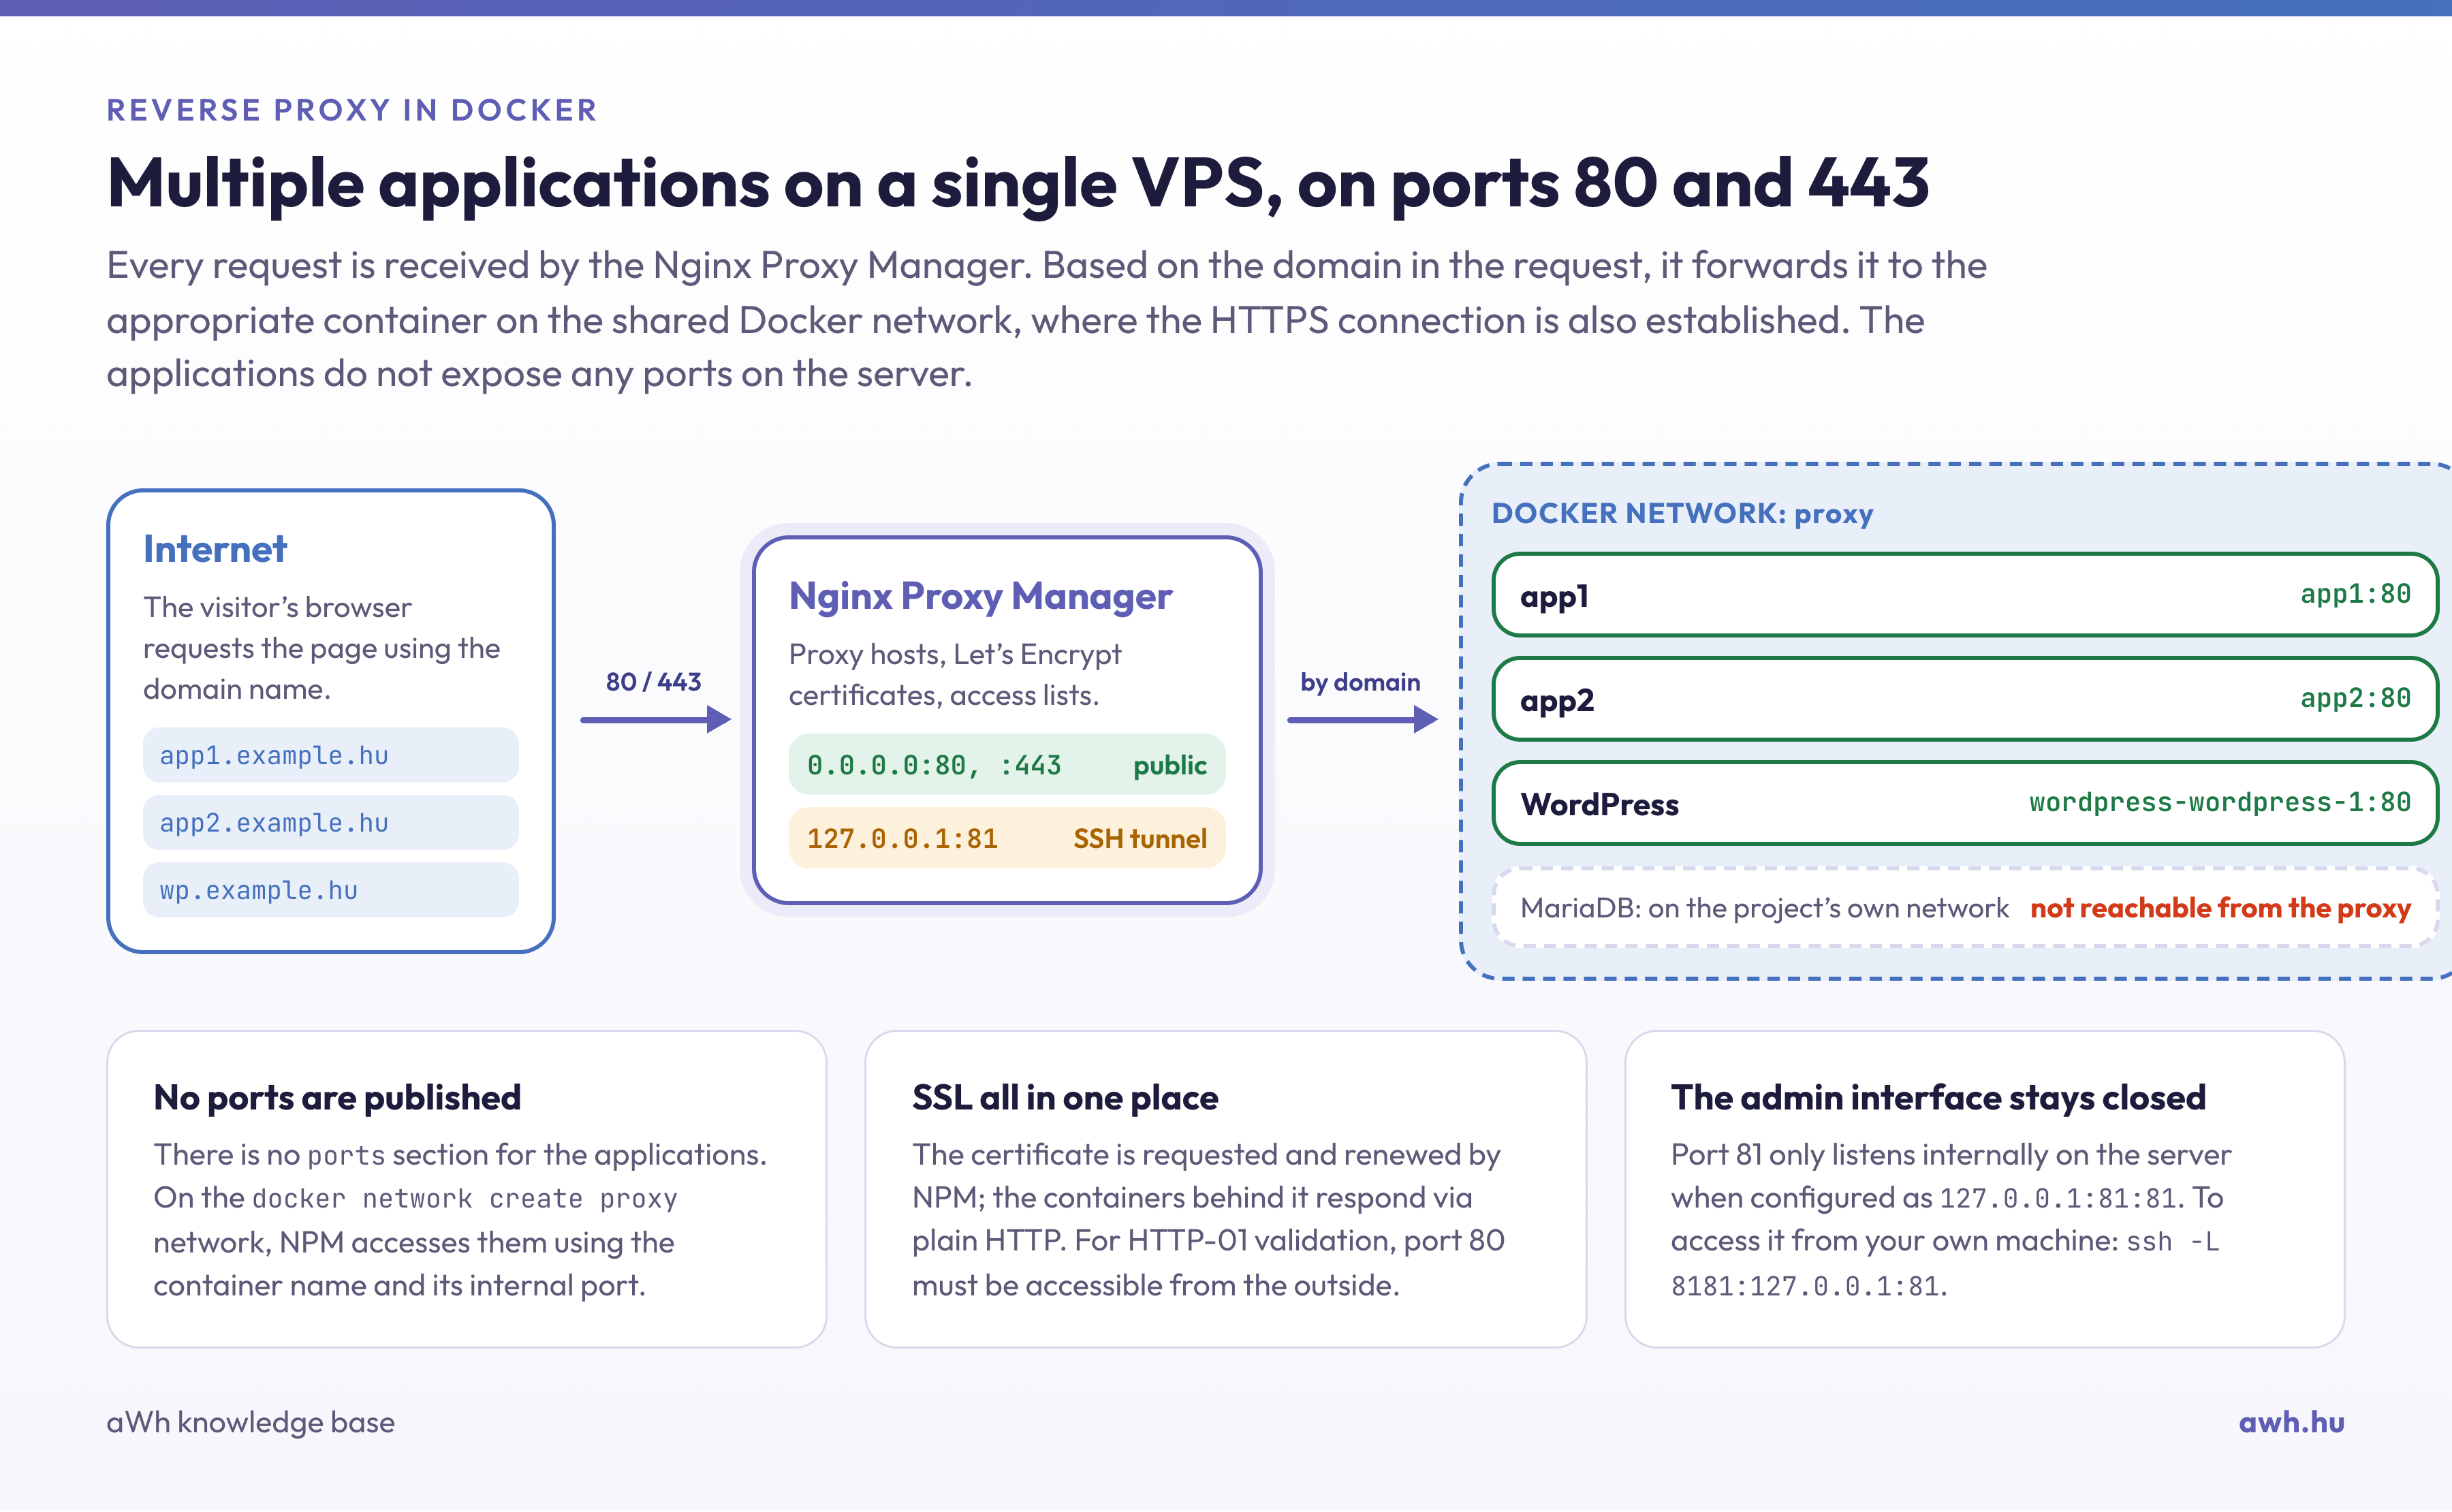
On a single server, only one program can use ports 80 and 443 at any one time. If you are running multiple web applications in Docker (for example, a WordPress site, an n8n instance and a custom application), you will need a reverse proxy: this receives all requests, forwards them to the appropriate container based on the requested domain, and also manages the SSL certificates.
Nginx Proxy Manager (NPM) is one such proxy, featuring a web-based management interface. There is no need to manually edit Nginx configuration files: simply enter the domain, the target container and the certificate in a few fields, and NPM will request and renew Let’s Encrypt certificates. It is ideal for use on your own KVM VPS, where several smaller applications share a single IP address.
We tested these steps in November 2026 on an Ubuntu 24.04 system, using Docker Engine 29.9.3, Docker Compose 5.7.0 and Nginx Proxy Manager 2.16.0. The test machine did not have a public domain, so we were unable to complete the Let’s Encrypt certificate request: we present its interface and describe its operation based on the documentation and the program’s source code, and we indicate this in the article. We verified the proxying on the server using the curl command, specifying the Host header.
Before you begin
- Docker and Compose. Instructions for installing them can be found in the article Installing Docker on Ubuntu, Debian and AlmaLinux, while the basics of Compose are covered in the article Using Docker Compose.
- Ports 80 and 443 must be free. If the server is running native Apache or Nginx, stop and disable it, otherwise the NPM container will not start (‘address already in use’). To see what is listening on the ports, run
sudo ss -ltnp. - DNS. To request a certificate, the A record (or, in the case of IPv6, the AAAA record) for the domain (e.g.
app1.pelda.hu) must point to the server’s IP address. - Firewall. Ports 80 and 443 must be accessible from the outside (see: How do I set up a firewall on my VPS?). Docker opens the published ports using its own rules, which take precedence over the rules of ufw and firewalld; this is why the control panel port must be bound to the local address, as shown below.
1. Shared Docker network
NPM and the applications connect via a shared Docker network. This means that the applications do not need to expose any ports on the server: NPM accesses them within the network using the container name. Set it up once:
docker network create proxy
2. The NPM compose.yaml file
mkdir -p ~/npm && cd ~/npm
nano compose.yaml
services:
  npm:
    image: jc21/nginx-proxy-manager:2.16.0
    restart: unless-stopped
    ports:
      - "80:80"
      - "443:443"
      - "127.0.0.1:81:81"
    environment:
      TZ: "Europe/Budapest"
    volumes:
      - ./data:/data
      - ./letsencrypt:/etc/letsencrypt
    networks:
      - proxy

networks:
  proxy:
    external: true
- Ports: ports 80 (HTTP) and 443 (HTTPS) are open to everyone; this is the proxy’s job. Port 81 is the admin interface: due to the
127.0.0.1:81:81configuration, it is only accessible from within the server. The official documentation states'81:81', but this would leave the login page open to the entire internet, regardless of the firewall. - Image: Please specify the version (
2.16.0) rather than using thelatesttag, so that whether to update remains your decision. - Volumes: the
datafolder contains the database (SQLite), settings and logs, while theletsencryptfolder contains the certificates. These two folders are the subject of the backup. networks: NPM connects to theproxynetwork created above; the settingexternal: trueindicates that the network is not managed by this project.- If the server does not support IPv6, the documentation states that the environment variable
DISABLE_IPV6: 'true'must also be set.
Start-up and the start-up log:
docker compose up -d
docker compose logs -f
On first launch, NPM creates the database and its keys. Once the line ‘Backend PID … listening on port 3000’ appears in the log, you’re all set; you can exit the log by pressing Ctrl+C.
3. Accessing the admin interface through an SSH tunnel
As port 81 is only accessible from within the server, you can access it via an SSH tunnel from your own computer. Run the following on your own computer (replace the username and address with your own):
ssh -L 8181:127.0.0.1:81 felhasznalo@szerver-ip
While this connection is open, entering the address http://localhost:8181 in your browser will open the NPM control panel. If you use this frequently, you can also add the tunnel to the ~/.ssh/config file using the LocalForward line (see: Using the SSH config file). The article How do I connect to my VPS via SSH? provides general information about SSH connections.
4. First login
Older versions started with a default account admin@example.com, password changeme), and many guides still refer to this today. In version 2.16.0, there is no such account: when you first log in, the Welcome! page appears, where you must create the administrator account.
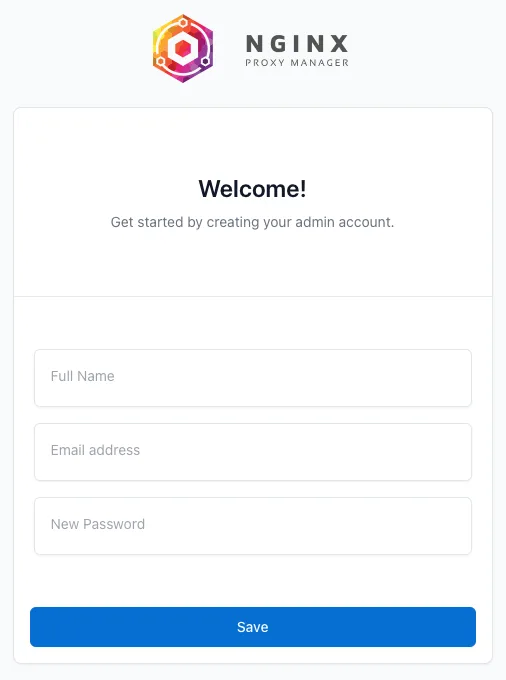
Enter your full name, a valid email address and a strong password, then click the Save button. In our test, saving took a few seconds, after which the login page appeared.
The email address is not only required for login: according to the program’s source code, NPM uses this address to register with Let’s Encrypt when requesting a certificate, and automatically accepts Let’s Encrypt’s terms of use. If an error message indicates an invalid address when requesting a certificate, please correct it in your account (top right-hand corner, by clicking on your name: Edit Profile).
After logging in, the home page (Dashboard) displays the number of entries added:

The control panel opens in English. You can switch to Hungarian (Magyar) using the globe icon in the top right-hand corner; in this article, we have quoted the English labels. Two-Factor Auth can also be found in the same menu (by clicking on its name): as the control panel provides full access to the server’s web traffic, it is advisable to enable two-factor authentication.
5. Two test applications
As a test, launch two small applications on the proxy network: an Nginx instance with a simple page (app1) and the traefik/whoami image (app2), which displays the request it has received.
mkdir -p ~/apps/app1 && cd ~/apps
echo "<h1>This is app1</h1>" > app1/index.html
nano compose.yaml
services:
  app1:
    image: nginx:alpine
    restart: unless-stopped
    volumes:
      - ./app1:/usr/share/nginx/html:ro
    networks:
      - proxy

  app2:
    image: traefik/whoami
    restart: unless-stopped
    networks:
      - proxy

networks:
  proxy:
    external: true
docker compose up -d
None of the services have a ports section: the containers cannot be accessed via any of the server’s ports, only via the proxy network, through NPM. The members of the network are displayed by the docker network inspect proxy command.
6. Adding a proxy host
In the top menu, select Hosts › Proxy Hosts, then click the Add Proxy Host button. On the Details tab:
- Domain Names: the domain to which requests are directed (
app1.pelda.hu). Press Enter after typing; you can enter multiple domains. - Scheme:
http. Containers on the internal network mostly communicate via plain HTTP; HTTPS is handled by NPM. - Forward Hostname / IP: the name of the container on the shared network (
app1). - Forward Port: the container’s internal port on which the application is listening (
80for Nginx and whoami), not a published port. - Block Common Exploits: filters out some common attack patterns; you can enable this feature.
- WebSockets Support: enable this if your application uses WebSockets (for example, real-time interfaces and chat applications).
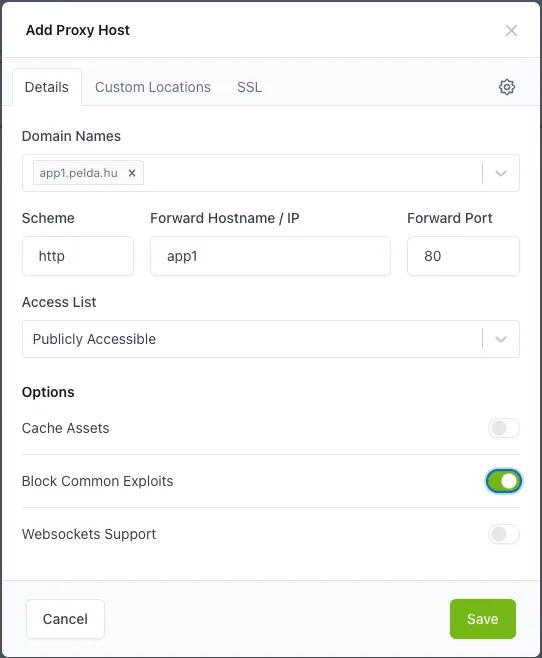
After clicking ‘Save’, add the second application in the same way (app2.pelda.hu, app2, 80).
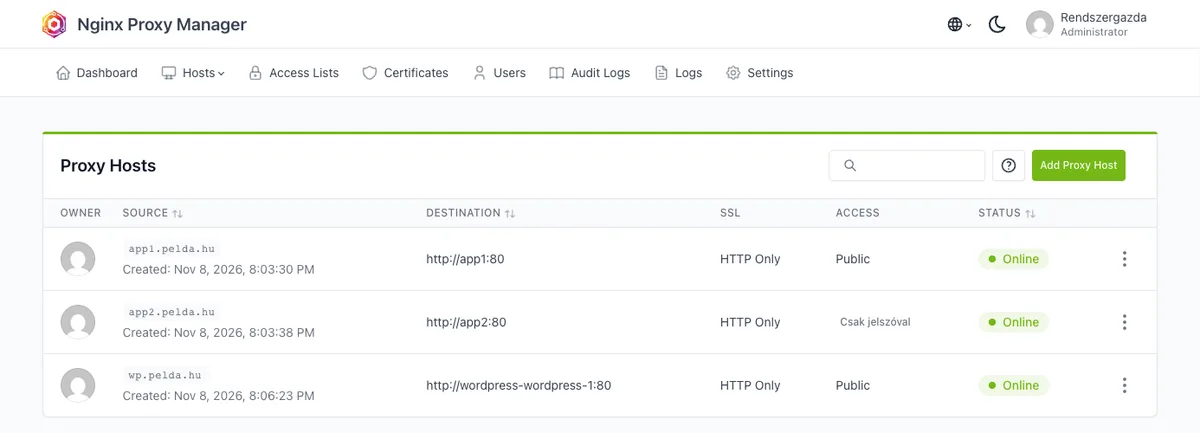
The Online status simply means that the Nginx configuration is valid; it does not mean that the target container is responding. During testing, an entry pointing to an incorrect port (app1:8080) and one pointing to a non-existent container were both marked as ‘Online’, yet the browser received a 502 Bad Gateway error for both. The other entries, meanwhile, functioned without any issues.
Try it out without DNS
Before changing your DNS settings, you can test the proxy on the server using the curl command: the -H "Host: ..." switch sends the domain that the browser would normally send.
curl -s -H "Host: app1.pelda.hu" http://127.0.0.1/
curl -s -H "Host: app2.pelda.hu" http://127.0.0.1/ | head -3
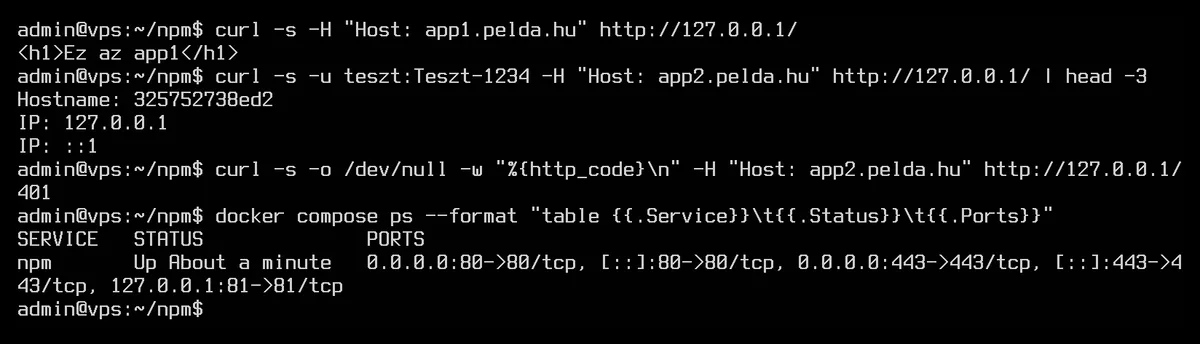
In the image, app2 is already protected by the access list shown below, which is why it returned a 401 error without a password.
You can try this out in your browser on your own computer by adding the domain and the server’s IP address to the hosts file (/etc/hosts on Linux and macOS, C:\Windows\System32\drivers\etc\hosts on Windows).
If a domain is accessed without a proxy host (or if the IP address is entered directly), NPM displays its own ‘Congratulations’ page. You can change this in Settings › Default Site to 404 Page, No Response (444), Redirect or Custom HTML; on a live server, the 404 page or a no-response closure (444) is standard.
Connecting an existing Compose project
You can integrate an application that is already running by adding your web service to the compose.yaml file on the proxy network and removing the ports section. The article on using Docker Compose demonstrates this using the example of WordPress and MariaDB, in the section on reverse proxys. The database should remain on the project’s own network: during testing, the db name could not even be resolved via the proxy.
In the Forward Hostname field, you should enter the full name of the container (in the test, this is wordpress-wordpress-1, as displayed by the docker compose ps command). The short name of the service (wordpress) also worked, but if there are services with the same name in two different projects on the proxy network, the short name is ambiguous.
The wp-config.php file in the official WordPress Docker image monitors the X-Forwarded-Proto-header sent by the proxy, so it does not get caught in a redirect loop even behind HTTPS; in our test, WordPress already redirected to the https:// address in response to a request arriving with the X-Forwarded-Proto: https-header. For other applications, check the documentation to see how to configure operation behind a proxy (often via a ‘trusted proxy’ or ‘base URL’ setting).
7. SSL certificate with Let’s Encrypt
You can request the certificate via the SSL tab in the proxy host’s edit window (click ⋮ › Edit at the end of the line in the list to open it):
- SSL Certificate: select the Request a new Certificate option.
- Toggle on the Force SSL switch (which redirects HTTP requests to HTTPS) and the HTTP/2 Support switch.
- Save.
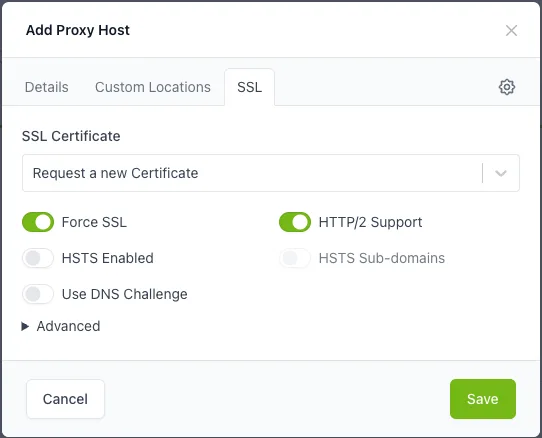
We were unable to test this step because the test server did not have a public domain; the following is based on the documentation and source code. By default, NPM requests a certificate using the HTTP-01 validation method: Let’s Encrypt searches for the server on port 80 using the domain name. Therefore, the certificate is only issued if the domain’s DNS already points to the server and port 80 is accessible from the outside. If either of these conditions is not met, the request will fail. NPM renews it automatically: during the test, the lines ‘Let’s Encrypt Renewal Timer initialised’ and ‘Renewing SSL certificates expiring within 30 days’ appeared in the log at start-up.
Only enable the HSTS Enabled toggle if you are certain that the site will remain permanently on HTTPS: browsers will then not even attempt to open it via HTTP for a certain period.
You can also manage certificates separately in the Certificates menu. The Add Certificate button offers the options Let’s Encrypt via HTTP, Let’s Encrypt via DNS and Custom Certificate (for uploading your own certificate, such as one you have purchased). In the HTTP window, the Test button uses an external service to check, based on the source code, whether the domain is accessible from outside before contacting Let’s Encrypt; it is advisable to run this before making the request.
DNS verification and wildcard certificates
If port 80 cannot be opened, or if a wildcard certificate is required (*.pelda.hu), enable the Use DNS Challenge toggle. In this case, NPM creates a TXT record via the DNS provider’s API, and Let’s Encrypt verifies this. Wildcards cannot be requested via HTTP verification; the interface clearly states: “Wildcards not permitted for this type”.
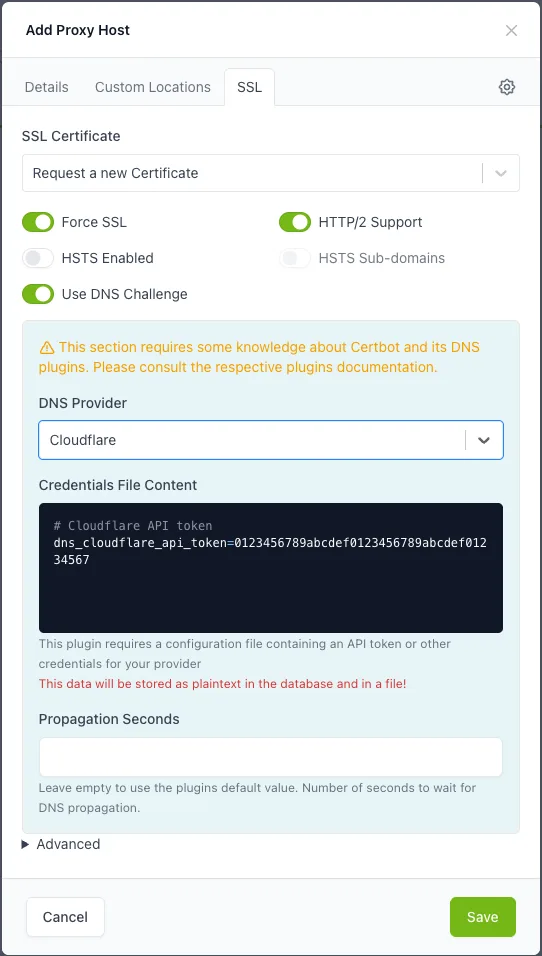
The DNS Provider list included 88 providers in the test, among them Cloudflare, DigitalOcean, Hetzner, OVH, Amazon Route 53 and the standard RFC 2136 (for your own DNS server). The provider’s API access details are entered into the Credentials File Content field; the field displays a sample of how to fill it in. NPM warns that this data will be stored in plain text in the database and in a file (“This data will be stored as plaintext in the database and in a file!”); therefore, you should only provide an API token restricted to the DNS records of the specific zone, not the full account key. The Propagation Seconds field can be left blank; if your service provider is slow to propagate the records, increase this value.
If you do not use NPM, you can request a Let’s Encrypt certificate directly; see: Requesting a Let’s Encrypt certificate with Certbot.
8. Access Lists
You can restrict access to an application by password or IP address, for example, an admin panel or a work-in-progress test site. In the Access Lists menu, click the Add Access List button to create a list:
- Details: the name of the list (Name). If Satisfy Any is enabled, either the password or an authorised IP address is sufficient; if disabled, both are required. Pass Auth to Upstream forwards the password header to the application as well.
- Authorisations: username and password pairs (Username, Password, Add).
- Rules: Allow and Deny rules apply to IP addresses or subnets (e.g.
192.168.1.0/24) in the order specified. If there is at least one rule, a ‘deny all’ rule is automatically added at the end of the list.
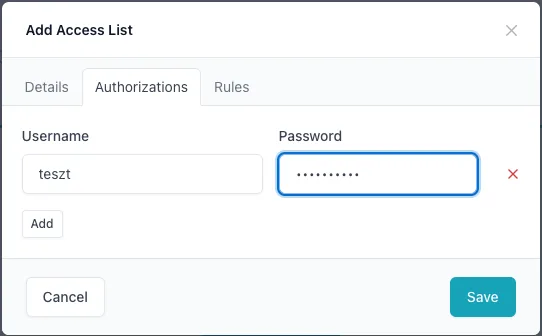
After saving, in the ‘Proxy Host Access List’ field, select the list instead of Publicly Accessible. In the test, the site app2.pelda.hu, protected in this way, returned a 401 error code without a password, but returned the ‘whoami’ response when the correct username and password were used (curl -u teszt:jelszo ...). As the password is transmitted unencrypted over HTTP, you should only use password-based protection in conjunction with an SSL certificate.
9. Streams: TCP and UDP transmission
In the Hosts › Streams menu, you cannot forward non-web traffic (such as a database or game server port) to a container. We have not tested this. According to the documentation, the stream port must also be specified in the NPM compose.yaml file (for example, - "5432:5432"); otherwise, the request will not even reach the NPM. You should only make a database accessible in this way if it really needs to be accessed from outside; in most cases, an SSH tunnel is more secure.
10. Securing the control panel
- Do not expose port 81. With the above setting of
127.0.0.1:81:81, the login page cannot be accessed from outside, only via an SSH tunnel. To verify this, run the commandsudo ss -ltnp | grep ':81 'on the server: in the test, the address127.0.0.1:81appeared, not0.0.0.0:81. - Strong passwords and two-factor authentication for accounts (Two-Factor Auth).
- Everyone has their own account. You can add further users via the Users menu; do not share the administrator account, and only grant Administrator rights to those who genuinely need them.
- The article on SSH server security settings covers SSH protection, as the control panel is then accessible via SSH.
11. Backup
The complete NPM configuration is located in the data and letsencrypt folders. Back up them together with the compose.yaml file, while the server is briefly taken offline:
cd ~/npm
docker compose stop
sudo tar czf ~/npm-mentes-$(date +%F).tar.gz -C ~/npm data letsencrypt compose.yaml
docker compose start
The folders are owned by root, which is why you need to use sudo. In our test, the downtime lasted only a few seconds; during this time, even the proxied sites are inaccessible, so for high-traffic sites, schedule the backup for a quiet period. When restoring, extract the backup into the ~/npm directory on a new server, set up the proxy network, and start it with the docker compose up -d command. Copy the backup to another machine as well.
The backup also contains the private keys for certificates and the API tokens for the DNS provider: please handle this accordingly.
12. Update
Before updating, make a backup and read the release notes for the new version on the project’s GitHub page. Then update the image in compose.yaml to the new version (for example, replacing jc21/nginx-proxy-manager:2.16.0 with the newer version), and then:
cd ~/npm
docker compose pull
docker compose up -d
Database changes are carried out automatically by NPM at start-up (these appear in the log as ‘Migrating Up…’ lines). The article Deleting Docker images, containers and volumes explains how to delete the old image.
Common errors
- 502 Bad Gateway: NPM cannot reach the target container. Check that the container is running (
docker compose ps), that it is on theproxynetwork (docker network inspect proxy), and that the Forward Port is the container’s internal port. - The certificate request is failing: the domain’s DNS is not yet pointing to the server (it may take several hours for the change to propagate), or port 80 is not accessible from outside the network. If you are unable to open port 80, please use the DNS check.
- The NPM container won’t start, ‘address already in use’: another program is using port 80 or 443; running
sudo ss -ltnpwill show which one. - Redirect loop behind HTTPS: the application is unaware that it is being accessed via HTTPS. Configure the application to operate behind a proxy (see above).