 English
 Magyar
 Deutsch



Docker Compose describes, in a YAML file (compose.yaml), which containers make up an application, and starts, updates or stops them with a single command. For a WordPress site, for example, two containers are required (the web server with PHP and the database), along with their associated volumes, passwords and network settings. Instead of long docker run commands, all of this is contained in a single file, which you can store in a version control system; copying it to another server will give you the exact same environment.
Compose is a typical feature of a dedicated KVM VPS: it allows you to run several independent applications side by side (such as WordPress, n8n or your own web application), each in its own folder with its own settings.
We tested these steps in November 2026 on an Ubuntu 24.04 system, using Docker Engine 29.9.3 and Docker Compose 5.7.0, installed from Docker’s own repository. The commands work in exactly the same way on AlmaLinux and Debian.
Installation: docker compose or docker-compose?
Compose is now a plugin for the Docker command-line tool; the command is therefore called docker compose, with a space. The old version, docker-compose (with a hyphen), written in Python, was version 1.x, which was deprecated in 2023; you may come across this in older documentation. The commands and file format are almost identical; you simply need to replace the hyphen with a space.
The Compose plugin is installed alongside Docker using the docker-compose-plugin package (see: Installing Docker on Ubuntu, Debian and AlmaLinux). Check:
docker compose version
Docker Compose version v5.7.0
Following the 2.x series, the version number jumped to 5; the commands and the compose.yaml format remain the same. If the docker compose command returns “unknown command”, the plugin is missing: install the docker-compose-plugin package from the Docker repository. On Ubuntu, when you type the docker-compose command, the system suggests the apt install docker-compose package: this is the old version 1.29, so do not install it.
In the examples in this article, the user is a member of the docker group, so the commands are shown without sudo. If you are not a member, prefix them with sudo.
Project structure
Each application should have its own folder, containing the compose.yaml and .env files:
~/wordpress/
├── compose.yaml   # description of the services
└── .env           # passwords and settings
Compose uses the folder name as the project name: the names of containers, volumes and networks begin with this (wordpress-db-1, wordpress_db_data). If you would like a different name, add a line at the start of the file reading name: sajatnev.
According to current recommendations, the file should be named compose.yaml (compose.yml is also acceptable). The old name, docker-compose.yml, still works. If both files are present in the same folder, Compose will display a warning (“Found multiple config files”) and use compose.yaml; therefore, you should either rename or delete the old file.
Example: WordPress and MariaDB
The following compose.yaml file sets up a WordPress site and a MariaDB database:
services:
  db:
    image: mariadb:11.8
    restart: unless-stopped
    environment:
      MARIADB_DATABASE: wordpress
      MARIADB_USER: wordpress
      MARIADB_PASSWORD: ${DB_PASSWORD:?Set DB_PASSWORD in the .env file}
      MARIADB_ROOT_PASSWORD: ${DB_ROOT_PASSWORD:?Add meg a DB_ROOT_PASSWORD-ot}
    volumes:
      - db_data:/var/lib/mysql
    networks:
      - backend
    healthcheck:
      test: ["CMD", "healthcheck.sh", "--connect", "--innodb_initialized"]
      interval: 10s
      timeout: 5s
      retries: 5
      start_period: 30s

  wordpress:
    image: wordpress:${WP_VERSION:-latest}
    restart: unless-stopped
    depends_on:
      db:
        condition: service_healthy
    environment:
      WORDPRESS_DB_HOST: db
      WORDPRESS_DB_NAME: wordpress
      WORDPRESS_DB_USER: wordpress
      WORDPRESS_DB_PASSWORD: ${DB_PASSWORD}
    ports:
      - "127.0.0.1:${WP_PORT:-8080}:80"
    volumes:
      - wp_data:/var/www/html
    networks:
      - backend

volumes:
  db_data:
  wp_data:

networks:
  backend:
The associated .env file:
DB_PASSWORD=Valtoztassa-meg-1
DB_ROOT_PASSWORD=Valtoztassa-meg-2
WP_PORT=8080
Change your passwords to long, random strings (for example, openssl rand -base64 24) and ensure that only you can read the file:
chmod 600 .env
There is no version: line at the start of the file. Compose no longer uses the version: "3.8" and similar keys found in older descriptions; if this remains in the file, the test will display the following warning: “the attribute version is obsolete, it will be ignored”. Feel free to delete it.
What do the sections mean?
services: containers. The service name (db,wordpress) is also the network name: WordPress accesses the database using the namedb(WORDPRESS_DB_HOST: db), without an IP address.image: the image used and its tag. In the database, record the major version (mariadb:11.8) to ensure that an update does not unexpectedly introduce a new major version.restart: unless-stopped: the container starts automatically after a shutdown or server restart, unless you have stopped it. In the test, WordPress and MariaDB started automatically after a restart, while the container previously stopped withdocker compose stopremained stopped. Other options:no(default),always,on-failure.volumes: the location of the data. Thedb_dataandwp_datanamed volumes are managed by Docker (under/var/lib/docker/volumes/). They remain in place even after the container is deleted, so data is not lost during updates.ports:127.0.0.1:8080:80maps port 80 of the container to port 8080 of the server, but only on the local network. It is therefore not accessible from outside, only via a reverse proxy set up in front of it; see below.networks: thebackendnetwork is a dedicated network for the two containers. If no network is specified, Compose automatically creates adefaultnetwork for the project; a named network is useful if you want to use multiple networks (see the section on proxies).healthcheckanddepends_on: WordPress only starts up once the database is responding (condition: service_healthy). Thehealthcheck.shscript can be found in the official MariaDB image. During the test, the database becamehealthyapproximately 40 seconds after the first start-up, and WordPress only started up after that.
The order of depends_on applies only to the docker compose up command. When the server is restarted, Docker starts the containers according to the restart rule and does not wait for dependencies: in the test, after the restart, the two containers started in the same second. The application must therefore tolerate the database being unavailable for the first few seconds.
Variables and the .env file
Compose populates the ${...} references from the .env file in the project folder (and from command-line environment variables) before the containers are started:
| Spelling | Report |
|---|---|
${DB_PASSWORD} |
The value of the variable; if not specified, an empty text field (with a warning) |
${WP_PORT:-8080} |
Default value: if the variable is empty or missing, 8080 |
${DB_PASSWORD:?message} |
Mandatory: if missing, Compose will stop with an error message |
The mandatory variable prevents the database from starting with an empty password. In the test, without the .env file, Compose did not even start the project:
error while interpolating services.db.environment.MARIADB_PASSWORD: required variable DB_PASSWORD is missing a value: Set DB_PASSWORD in the .env file
A variable specified on the command line takes precedence over the .env file: WP_PORT=8090 docker compose up -d uses port 8090.
Do not confuse the .env file with the env_file: key that can be specified for services. The .env file is inserted into the ${...} places in compose.yaml, whereas env_file: app.env passes the variables listed there directly to the container as env_files. If an application has many settings, env_file is shorter than listing them all under environment.
Checking and starting
Please check the file before starting:
cd ~/wordpress
docker compose config -q
It does not display anything without an error. Without the -q, it shows the complete, filled-in configuration, including the values substituted for the variables: this way you can see what actually goes into the containers. Please be careful, as passwords are also displayed in plain text; do not copy this output to a forum or a ticket.
Starting in the background:
docker compose up -d
On first launch, Compose downloads the images, creates the volumes and the network, and then starts the containers. Without the -d, it runs in the foreground and displays the logs for all containers in the terminal; in this case, pressing Ctrl+C stops the containers.
Everyday commands
Run every command in the project folder (or specify the file using the -f ~/wordpress/compose.yaml) switch.
| Command | What does it do? |
|---|---|
docker compose ps |
The project’s containers, their status and ports |
docker compose ls |
All Compose projects running on the machine |
docker compose logs -f |
Logs for all containers, in real time (to exit: Ctrl+C) |
docker compose logs --tail 50 wordpress |
The last 50 lines of a service |
docker compose exec db bash |
Command line in the running container |
docker compose restart wordpress |
Restarting a service |
docker compose stop |
Suspension; containers will remain in place |
docker compose start |
Starting stopped containers |
docker compose down |
Shutting down containers and deleting the network; the volumes will remain |
docker compose down -v |
Just like down, but it also deletes the volumes, i.e. the data |
The output of the ps command is extensive; you can retrieve the relevant columns as follows:
docker compose ps --format "table {{.Service}}\t{{.Status}}\t{{.Ports}}"
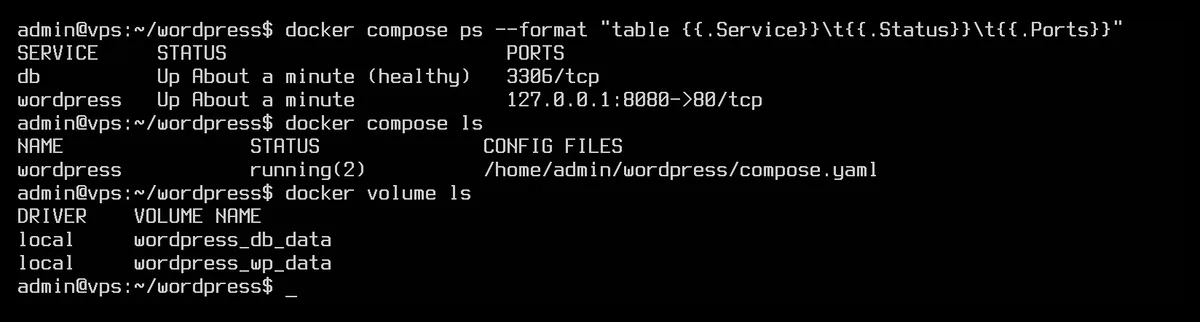
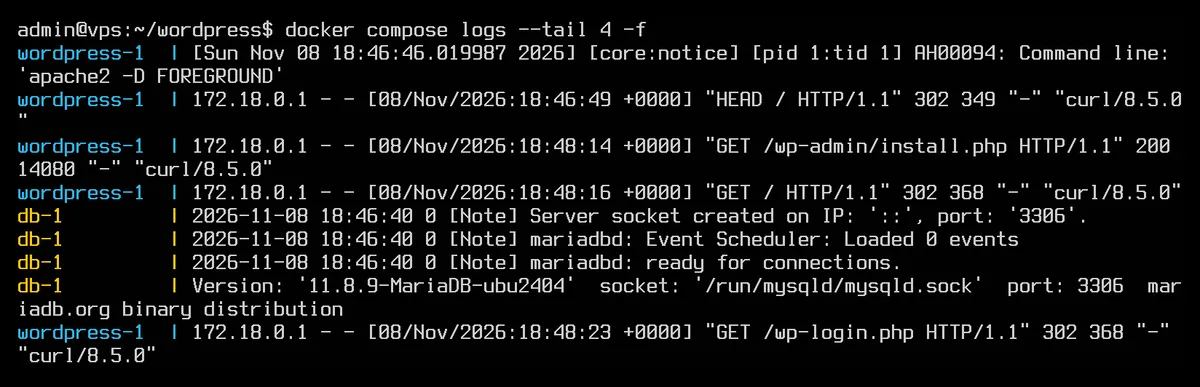
In the log, each line begins with the name of the container, highlighted in colour:
Some useful exec examples:
# MariaDB shell with the password set in .env
docker compose exec db mariadb -u wordpress -p wordpress

# PHP version in the WordPress container
docker compose exec wordpress php -v
When running from a script or via cron, add the -T switch (docker compose exec -T ...), as there is no terminal available there.
The danger of ‘-v’
The docker compose down command only deletes the containers and the network; the subsequent up -d command starts up with the same volumes, i.e. the same data. The down -v command, however, also deletes the project’s named volumes, thereby removing the database and any uploaded files. In our test, the volume disappeared immediately after the command was issued (“Volume proba_adat Removed”), without any confirmation prompt. Only use this if you really want to remove the entire project and its data, and ensure you take a backup beforehand.
Update
Updating images involves two commands:
docker compose pull
docker compose up -d
The pull command downloads the latest images for the tags (e.g. wordpress:latest, mariadb:11.8), while up -d only recreates those containers whose image or configuration has changed; the rest continue to run. The data in the volumes is retained. The up -d command applies changes to compose.yaml or .env in the same way: in the test, after changing WP_PORT, only the WordPress container restarted, on the new port.
Old images remain on the disk. You should clear them out from time to time; the article Deleting Docker images, containers and volumes explains how to do this and how to monitor disk usage.
Before upgrading to a new major version (for example, from MariaDB 11.8 to a newer series), always make a backup and read the image description on Docker Hub: some databases cannot automatically upgrade to the new major version.
Creating your own image
If the application has its own Dockerfile, the build key, rather than the image, specifies where Compose should build from:
services:
  web:
    build: ./app
    ports:
      - "127.0.0.1:8081:80"
docker compose build        # build only
docker compose up -d --build  # build and start
Please note: simply running docker compose up -d will not rebuild the image if it already exists. In testing, after modifying the source file, up -d continued to serve the old content; only up -d --build applied the new content.
Reverse proxy: multiple applications on a single server
In this example, WordPress is only listening on the address 127.0.0.1:8080. Ports 80 and 443 are handled by a reverse proxy, which determines which container to forward the request to based on the domain in the request, and also manages the SSL certificate. One such example is the web-based Nginx Proxy Manager, the configuration of which is explained in the article Installing Nginx Proxy Manager with Docker.
If the proxy is running in Docker, you do not even need to expose the port: it is sufficient for the web container to be on the same network as the proxy. Set up the shared network once:
docker network create proxy
Then, in the compose.yaml file, remove the ports section for WordPress and add it to the public network as well:
  wordpress:
    # ... the other settings unchanged, without the ports section
    networks:
      - backend
      - proxy

networks:
  backend:
  proxy:
    external: true
external: true means that the network is not created by this project, nor is it taken down by it. The database should remain only on the backend network: during testing, the wordpress and wordpress-wordpress-1-wordpress-1’ names were resolvable from the proxy container, but the db was not, so the database is not accessible from the proxy either.
Docker and the firewall
If you specify the port without an address (e.g. "8080:80"), Docker will open it on all network addresses using its own firewall rules. These take precedence over ufw and firewalld rules, meaning the port may still be accessible from the outside even if you have not authorised it in the firewall (we tested this with firewalld in our article on SQL Server: SQL Server Express on Linux). Therefore, any port used only internally on the server or by a proxy should be prefixed with 127.0.0.1:. You can check which services are currently listening on externally accessible addresses by following the instructions in the article Listing open ports: ss and lsof; for information on configuring the firewall, see the article How do I set up a firewall on my VPS?.
Backup
Compose does not create backups; you must save the contents of the volumes yourself. There are two methods:
Database backup while the system is running
When it comes to databases, the most reliable option is the provider’s own backup tool, which provides a consistent backup even from a running server:
cd ~/wordpress
set -a; . ./.env; set +a
docker compose exec -T db mariadb-dump -u root -p"$DB_ROOT_PASSWORD" --single-transaction wordpress > wordpress-$(date +%F).sql
Restoring to an empty database:
docker compose exec -T db mariadb -u root -p"$DB_ROOT_PASSWORD" wordpress < wordpress-2026-11-08.sql
Backing up a volume with tar and a helper container
The volumes containing the files are wrapped in a short-lived auxiliary container, which contains both the volume and the current folder. Before doing so, stop any service that is writing to the volume to ensure that the files do not change while the backup is in progress:
cd ~/wordpress
docker compose stop wordpress
docker run --rm -v wordpress_wp_data:/data:ro -v "$PWD":/backup alpine \
  tar czf /backup/wp_data-$(date +%F).tar.gz -C /data .
docker compose start wordpress
The full name of the volume consists of the project name and the volume name, both underlined (wordpress_wp_data); this is displayed by the docker volume ls command. The owner of the backup file will be root, as the helper container runs as root.
Restore: delete the old volume, create it again using Compose (which creates containers and volumes without starting them), unpack the backup into it, then start the project:
docker compose down
docker volume rm wordpress_wp_data
docker compose create
docker run --rm -v wordpress_wp_data:/data -v "$PWD":/backup:ro alpine \
  tar xzf /backup/wp_data-2026-11-08.tar.gz -C /data
docker compose up -d
In the test, the restored WordPress files were restored together with their owner (www-data), and the site responded immediately after the restoration.
Along with the backup, make sure to save the compose.yaml and .env files as well, and regularly copy the backups to another machine (see: Copying files between servers). For scheduled execution, the article Crontab syntax and scheduled tasks on Linux provides guidance.
Common errors
- “no configuration file provided: not found”: you did not run the command from within the project folder, or the file name differs from the usual one. Navigate to the folder or specify the file using the
-fswitch. - “required variable … is missing a value”: the
.envfile is missing, is in a different folder, or the variable is missing from it. The.envfile must be located next to thecompose.yamlfile. - ‘Port is already allocated’ or ‘Address already in use’: the port is already in use by another service on the server (another container or a native web server). Please select a different port or stop the other service.
- “Permission denied while trying to connect to the Docker API”: the user is not a member of the
dockergroup, or has not logged in again since being added to the group. Usesudoor log out and log back in. - The container keeps restarting (
Restartingstatus inps): check its logs (docker compose logs --tail 50 <service>); this is usually caused by a missing variable, an incorrect password or a permissions error. The article Reading log files: journalctl and /var/log covers system-level logging.
Related articles
- If you’d like to run an application using Compose in a production environment, take a look at the n8n example: a step-by-step guide to installing n8n on a VPS.
- If you would prefer to manage Compose projects via a web browser, the article Docker web interfaces: Portainer, Dockge and Coolify outlines the tools available for this purpose.