 English
 Magyar
 Deutsch



Docker can be managed via the command line by default: docker ps, docker compose up -d, docker logs. If multiple applications are running in containers on a server, many people find it more convenient to view and edit the containers, logs and Compose files via a web browser. There are three popular tools for this that can be installed on your own server:
- Portainer CE: a general-purpose Docker management interface. Containers, images, volumes, networks and Compose stacks all in one place.
- Dockge: a small, simple interface designed specifically for Docker Compose stacks. The Compose files remain on the disk and can be managed in the same way from the command line.
- Coolify: a PaaS running on your own server (modelled on Heroku, Vercel or Netlify). It builds and deploys applications from a Git repository, launches databases, and configures domains and HTTPS.
All three work well on a Linux-based KVM VPS. For Portainer and Dockge, you must first install Docker (see: Installing Docker on Ubuntu, Debian and AlmaLinux), while Coolify installs its own version. The structure of Compose files is explained in the article Using Docker Compose.
We tested these steps in November 2026 on x86_64 virtual machines running Ubuntu 24.04, using Docker Engine 29.9.3 and Docker Compose 5.7.0, alongside Portainer CE 2.45.3 LTS, Dockge 1.5.0 and Coolify 4.6.0. Run the commands using sudo or as the root user.
When is a web interface helpful, and when does it pose a risk?
This is useful if:
- There are several Compose applications running on the server, and you want to quickly see which ones are running, which ones have stopped, and how much memory they are using;
- you wish to access the logs, the container console or edit a Compose file via a web browser;
- There are also colleagues who manage the server but are not entirely comfortable using the command line;
- You want to install automatically from a Git repository (this is where Coolify comes in).
Risk, because:
- Docker socket root access. All three tools control Docker via the
/var/run/docker.sockfile. Anyone who gains access to the interface can launch a container that mounts the server’s entire file system, effectively granting them root privileges on the server. A Portainer or Dockge instance with a weak password and exposed to the internet is just as dangerous as a root SSH connection without a password; - Docker bypasses the firewall. Docker opens the published ports (
-p 9443:9443) using its own iptables rules. In the test, with ufw enabled (only SSH permitted), Portainer’s port 9443 and Docker’s port 5001 remained accessible from the outside, while ports bound to127.0.0.1were not. Details: How do I set up a firewall on my VPS?; - The first person to log in will be the system administrator. All three tools create the system administrator upon first login, and whoever logs in first takes control of the server. Therefore, create the account immediately after installation.
If you’re only running one or two containers and are comfortable using the command line, you don’t need a web interface: fewer running services mean fewer potential attack vectors.
Comparison
| Portainer CE | Dockge | Coolify | |
|---|---|---|---|
| What is this? | General Docker Manager | Compose stack manager | PaaS on your own server |
| Licence | zlib (open source); the Business Edition is a paid service | MIT | Apache 2.0 |
| Memory usage during the test | approx. 25 MB | approx. 135 MB | approx. 500 MB (Coolify, PostgreSQL, Redis, Traefik, Sentinel) |
| System requirements | Any VPS running Docker | Any VPS running Docker | According to the documentation, a minimum of 2 CPU cores and 2 GB of RAM is required; the installer displays a warning if disk space is less than 30 GB |
| Ports | 9443 (HTTPS), 8000 (Edge agents, optional) | 5001 (HTTP) | 8000 (interface), 6001, 6002, and the proxy: 80, 443 (TCP and UDP), 8080 |
| Location of Compose files | In the Portainer volume (/data/compose/<number>/) |
On the disk, /opt/stacks/<name>/compose.yaml |
Coolify manages the content under the /data/coolify/ directory |
| Multiple servers | Yes (via agents) | Yes (Dockge Administrators, beta) | Yes (via SSH) |
| Two-factor authentication | We could not find this in the CE settings | None | Available (TOTP and passkey) |
| Who is it for? | For those who want to see everything and manage it with a single click in Docker | Anyone who works with Compose files and would like a user-friendly interface for them | For those who wish to install from a Git repository, with a domain and HTTPS, with minimal manual effort |
All three container images are available in an arm64 (ARM) version as well as x86_64; Portainer and Dockge are also available for 32-bit ARM (armv7). We have not tested them on ARM.
Portainer and Dockge can coexist on a single server (they ran together in the test) and can see each other’s stacks: Portainer displays stacks not launched by it as ‘Limited’ and manages these only to a limited extent. Coolify, on the other hand, reserves both ports 80 and 443 for its own proxy, so it is intended for a clean server, without any other web server or Nginx Proxy Manager.
Access via an SSH tunnel
The most secure option is for the control panel’s port to listen only on the server’s local address (127.0.0.1) and for you to access it from your own computer via an SSH tunnel. This way, the control panel is completely invisible from the internet, you do not need to open a port in your firewall, and the login is protected by an SSH key. On your own computer:
ssh -N -L 9443:127.0.0.1:9443 -L 5001:127.0.0.1:5001 felhasznalo@szerver-ip
While this command is running, Portainer will open at https://localhost:9443 and Dockge at http://localhost:5001 in your browser. Due to the -N, no command prompt will open; press Ctrl+C to close the tunnel. If you use this frequently, add the LocalForward lines to your SSH config file. If you still wish to access the interface via a domain name over HTTPS, place it behind a reverse proxy (such as Nginx Proxy Manager), with a strong password and, if possible, restricted by IP address.
The commands below therefore bind the Portainer and Dockge ports to the address 127.0.0.1. If you wish to access the interface directly via the server’s IP address, omit the 127.0.0.1: prefix, but be aware of the risks outlined above.
Portainer CE
Installation
Portainer data (users, settings, stacks created within the interface) is stored in a named volume:
sudo docker volume create portainer_data
sudo docker run -d -p 127.0.0.1:9443:9443 --name portainer --restart=always \
  -v /var/run/docker.sock:/var/run/docker.sock \
  -v portainer_data:/data \
  portainer/portainer-ce:lts
The lts tag refers to the long-term support branch (version 2.45.3 LTS in the test), while sts refers to the short-term support branch, which is updated more frequently. The official command also exposes port 8000 (-p 8000:8000): this is only required for Edge agents, which can be used to connect remote machines behind NAT to Portainer. It can be omitted when managing a single server. Portainer does not expose HTTP port 9000 by default.
The same with Docker Compose, for example in the /opt/portainer/compose.yaml file:
services:
  portainer:
    container_name: portainer
    image: portainer/portainer-ce:lts
    restart: always
    ports:
      - "127.0.0.1:9443:9443"
    volumes:
      - /var/run/docker.sock:/var/run/docker.sock
      - portainer_data:/data

volumes:
  portainer_data:
    name: portainer_data
cd /opt/portainer
sudo docker compose up -d
Portainer starts with a self-signed certificate, so the browser will display a warning the first time you open it; you can safely accept this via an SSH tunnel.
First login: installation token and a 5-minute time limit
According to the documentation, since Portainer 2.43 (or 2.39.4 LTS), an installation token is also required to create the first administrator; Portainer records this token in its log:
sudo docker logs portainer 2>&1 | grep setup_token
setup_token=78c3eb02...
Open the URL https://localhost:9443, enter the admin name (admin by default), a password of at least 12 characters and the token, then click the Create user button.
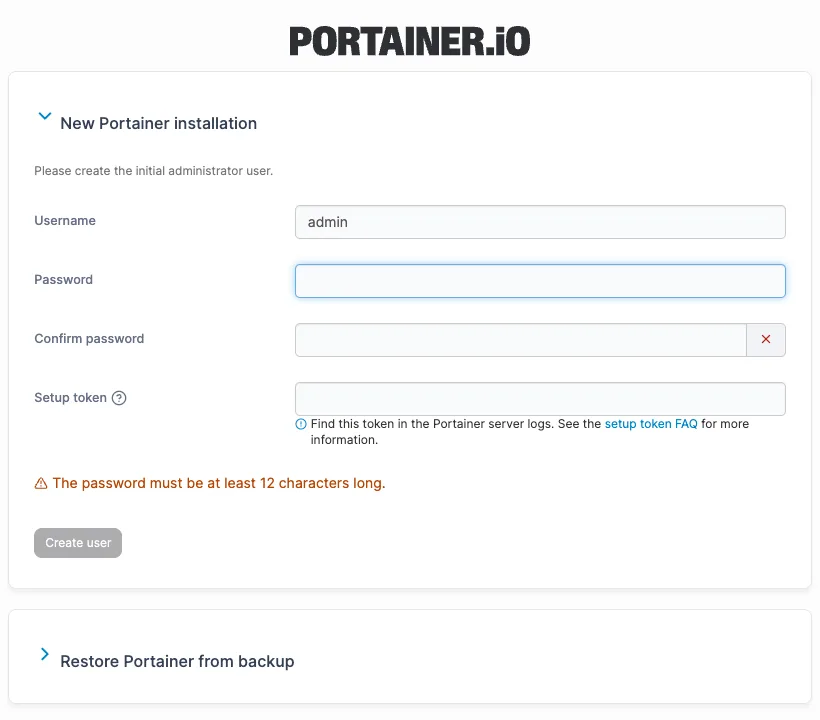
You have 5 minutes to do this. If you do not create the user within 5 minutes of the container starting, Portainer will block the installation for security reasons. During the test, the container continued to run, but the interface displayed the following message: “Your Portainer instance timed out for security purposes”. In this case, restart it and retrieve the new token from the log:
sudo docker restart portainer
sudo docker logs portainer 2>&1 | grep setup_token | tail -1
After logging in, Portainer prompts you to enable Edge Compute (Skip), then on the Environment Wizard screen, select Get Started and choose the local Docker instance. On the Home page, click on the local environment to access the control panel.
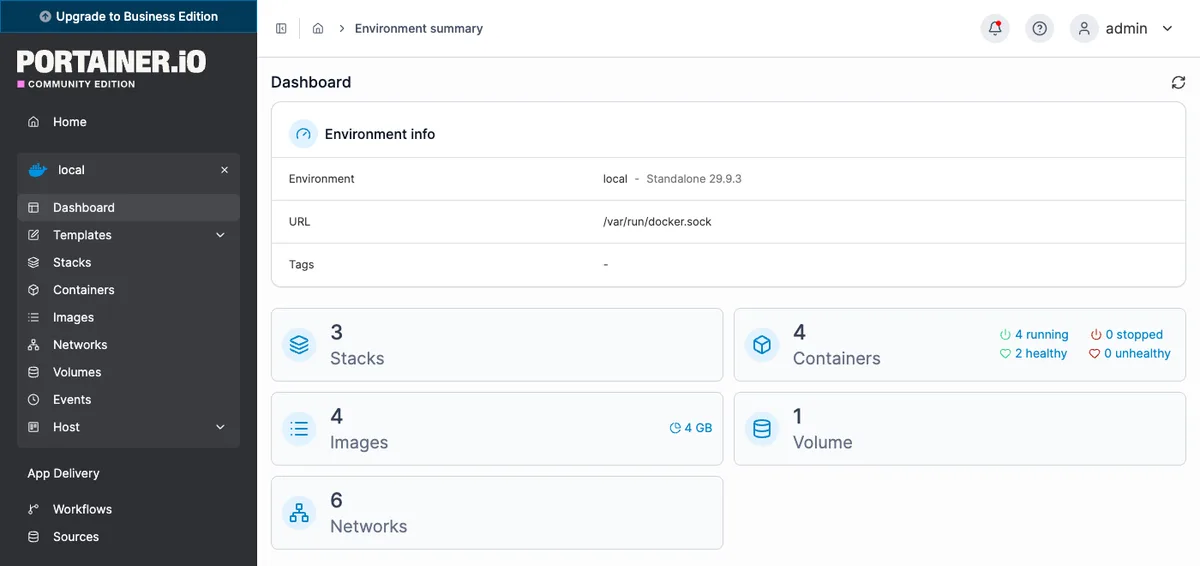
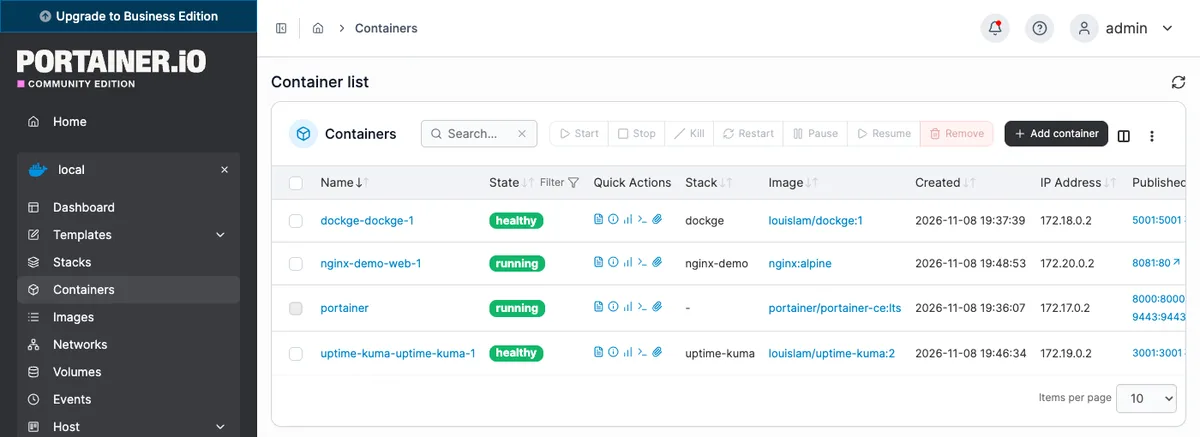
The Containers menu displays a list of containers. The icons at the end of each row open the log, details, resource usage and console; the buttons at the top allow you to start, stop, restart or delete the selected containers.
The first stack
A Compose application in Portainer is called a ‘stack’. On the Stacks › Add stack page, give the stack a name (for example, nginx-demo), set the Build method to Web editor, and paste the Compose file:
services:
  web:
    image: nginx:alpine
    restart: unless-stopped
    ports:
      - "127.0.0.1:8081:80"
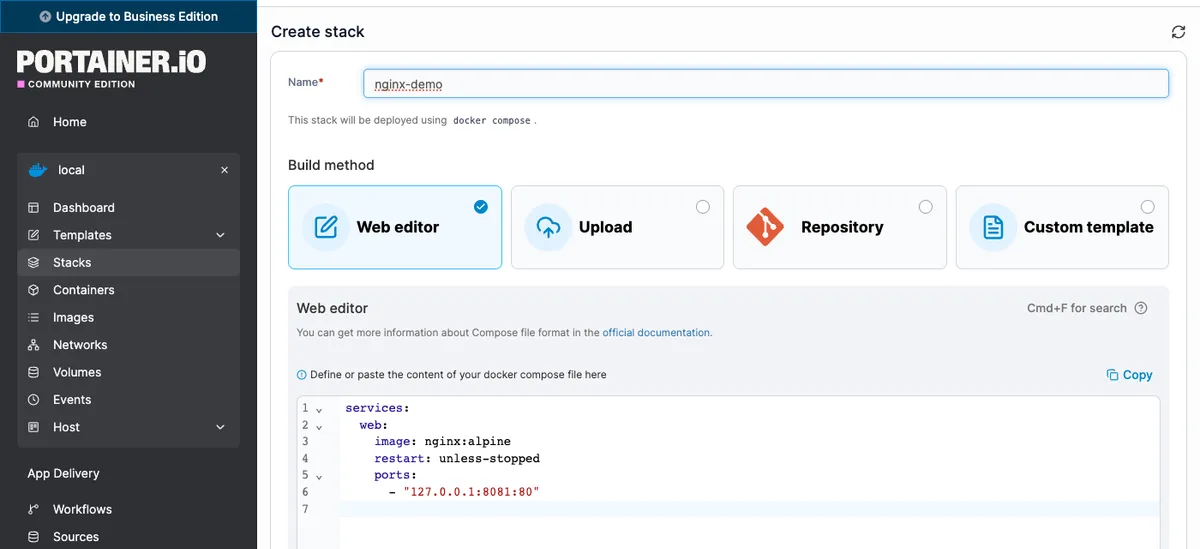
At the bottom of the page, the Deploy the stack button downloads the image and starts the container. Portainer stores the Compose file in its own volume (/data/compose/1/docker-compose.yml in the test environment), not in a folder of your choice. Therefore, do not use a relative volume path (./data:/app/data) here: specify a named volume or a full path (/srv/app/data:/app/data).
Updating a stack: on the stack’s page, under the Editor tab, either edit the file or leave it as it is, then click Update the stack. In the window that appears, clicking the Re-pull image and redeploy button will prompt Portainer to download the latest version of the images.
Updating and removing Portainer
Updating Portainer involves recreating the container; the data is retained in the portainer_data volume (in our test, it was possible to log in with the old password after the update, without an installation token):
sudo docker stop portainer
sudo docker rm portainer
sudo docker pull portainer/portainer-ce:lts
sudo docker run -d -p 127.0.0.1:9443:9443 --name portainer --restart=always \
  -v /var/run/docker.sock:/var/run/docker.sock \
  -v portainer_data:/data \
  portainer/portainer-ce:lts
Using Compose: cd /opt/portainer && sudo docker compose pull && sudo docker compose up -d.
Removal:
sudo docker rm -f portainer
sudo docker volume rm portainer_data
Stacks launched with Portainer will continue to run, but their Compose files will be deleted along with the volume. Please back them up beforehand (using the Copy button on the Editor tab of the stack, or from the compose folder within the volume).
Dockge
Dockge is a tool developed by the creator of Uptime Kuma. Each stack is a folder under /opt/stacks, containing the compose.yaml and .env files. The interface edits these files and runs the docker compose command, meaning that the same stack can also be managed from the command line and works without Dockge.
Installation
sudo mkdir -p /opt/stacks /opt/dockge
cd /opt/dockge
sudo curl -fsSL https://raw.githubusercontent.com/louislam/dockge/master/compose.yaml -o compose.yaml
The downloaded file publishes Dockge’s port 5001 to all addresses. If you are accessing it via an SSH tunnel, change the line under ports to 127.0.0.1:5001:5001, for example as follows:
sudo sed -i 's/- 5001:5001/- 127.0.0.1:5001:5001/' compose.yaml
sudo docker compose up -d
The file mounts the Docker socket, Docker’s own data directory (./data) and the /opt/stacks directory. If you wish to store the stacks in a different directory, you must also update the DOCKGE_STACKS_DIR variable and the volume, ensuring that the same full path appears on both sides of the volume (for example, /srv/stacks:/srv/stacks); otherwise, the stack data will be stored in the wrong location.
Dockge serves content via HTTP without encryption, so you should only use it over the internet via an SSH tunnel or behind an HTTPS reverse proxy.
First login and the first stack
At the address http://localhost:5001, Dockge will appear in the browser’s language, including Hungarian. On the first page (Create Administrator User), enter a username and a strong password. There is no time limit here, so please create your account immediately after installation.
To create a new stack, click the Compose button, enter a name in lower case (e.g. uptime-kuma) in the Stack Name field, and enter the Compose file into the editor on the right:
services:
  uptime-kuma:
    image: louislam/uptime-kuma:2
    restart: unless-stopped
    ports:
      - 127.0.0.1:3001:3001
    volumes:
      - ./data:/app/data
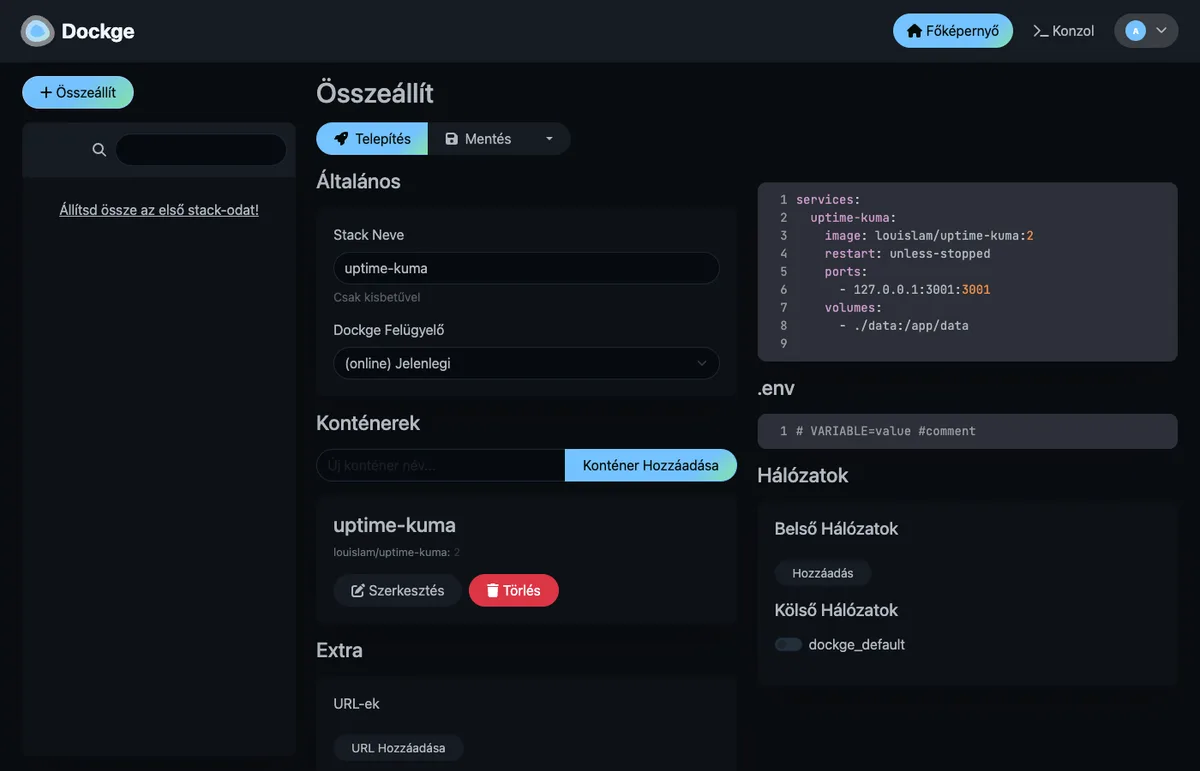
The Install button saves the file to /opt/stacks/uptime-kuma/compose.yaml and starts the stack; the Save button only saves the file. The output of the download and start processes is displayed in real time. On the running stack page, the Edit, Restart, Refresh and Stop buttons are available, as well as the container log and the Bash button, which opens the container’s command line. According to the documentation, Refresh downloads the latest version of the images and restarts the stack with them.
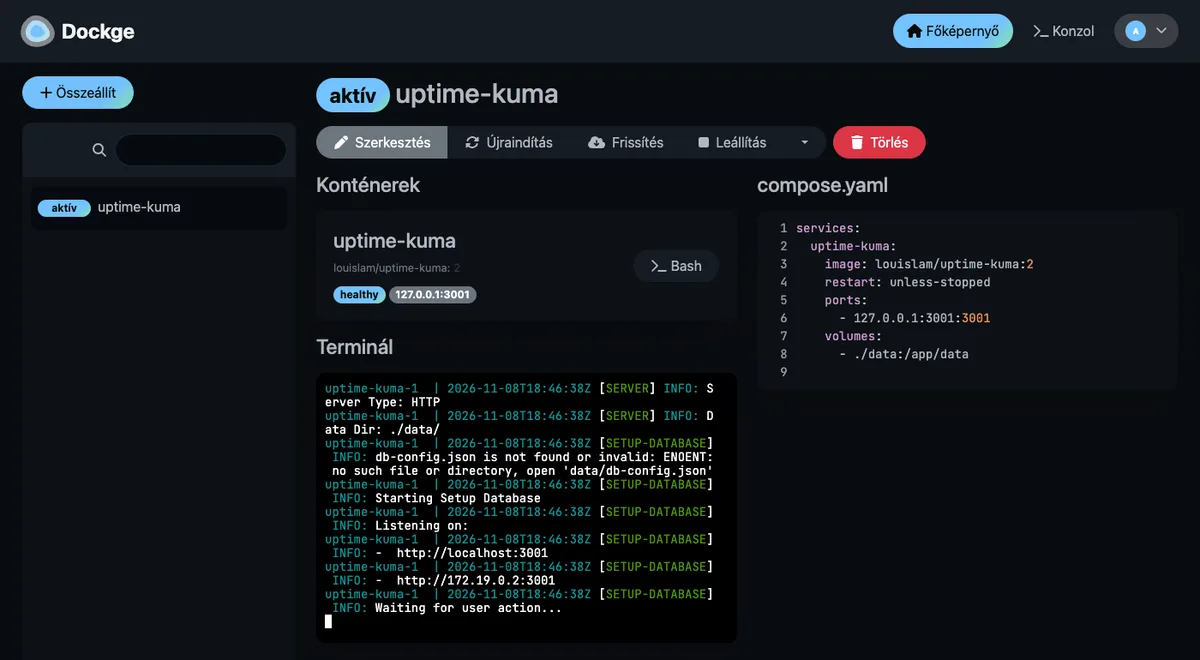
The relative path (./data) here refers to the stack directory; thus, Uptime Kuma’s data is stored in the /opt/stacks/uptime-kuma/data directory. The Convert to Compose field on the main screen converts a docker run command into a Compose file, while the Import Stack Directory option in the top-right menu adds stacks that have been manually copied to the /opt/stacks directory to the list.
The same from the command line:
cd /opt/stacks/uptime-kuma
sudo docker compose ps
sudo docker compose logs -f
Updating and removing Dockge
cd /opt/dockge
sudo docker compose pull
sudo docker compose up -d
Removal: cd /opt/dockge && sudo docker compose down, then, once no longer required, sudo rm -rf /opt/dockge. The stacks will continue to run (in the test, Uptime Kuma continued to run even after Dockge was stopped), and their Compose files will remain in /opt/stacks.
The latest release of Dockge is 1.5.0 (March 2025); the source code has continued to receive fixes since then, but no new release had been published at the time of testing. Two-factor authentication is not included. On the Settings › Security page, the ‘Disable Authentication’ option completely disables password protection: only use this if another authentication layer (such as a password-protected reverse proxy) is placed in front of Dockge.
Coolify
Coolify does more than just manage Docker: it builds applications from Git repositories, Dockerfiles, Compose files or pre-built images; it starts and performs backups of databases; and it assigns domains and Let’s Encrypt certificates to applications via its own Traefik proxy. A single Coolify instance can manage multiple servers via SSH.
Before you install
- Install it on a clean server. Coolify reserves ports 80 and 443 for its own proxy, so do not install it on a server where a web server, Nginx Proxy Manager or any other application is already running.
- System requirements. According to the documentation, at least 2 CPU cores, 2 GB of RAM and 10 GB of free disk space are required. The installer is more stringent than this: it issues a warning if the disk is smaller than 30 GB or if there is less than 20 GB of free space (during the test, it displayed a warning on a 29 GB disk, then continued after 5 seconds). Coolify’s own containers took up approximately 500 MB of memory and approximately 3 GB of disk space during the test; on top of this come the applications and builds.
- Supported systems. According to the documentation, it can be installed on Debian- and Ubuntu-based systems (Ubuntu LTS releases), Red Hat-based systems (AlmaLinux, Rocky Linux, Fedora), SUSE, Arch and Alpine systems, on x86_64 and arm64 processors.
- Docker installed via Snap is not suitable. If you have installed Docker via Snap on Ubuntu, please remove it first; the installer will then install it from the official Docker repository.
- Root SSH access via a key. Coolify also manages its own server via SSH, as the root user.
Installation
The official installer:
curl -fsSL https://cdn.coollabs.io/coolify/install.sh | sudo bash
If you’d like to read it first, download it (curl -fsSL https://cdn.coollabs.io/coolify/install.sh -o install.sh), have a look through it, then run it using the command sudo bash install.sh. In the test, the script completed nine steps in 2 minutes and 43 seconds:
- installed the missing packages (
curl,wget,git,jq,openssl); - checked whether the OpenSSH server is running and whether root login is enabled (the default setting in Ubuntu,
prohibit-password, applies: login is only permitted via key); - installed the Docker Engine (29.9.3) from the Docker repository;
- created the
/etc/docker/daemon.jsonfile: log rotation (10 MB, 3 files) and the address range for container networks (10.0.0.0/8, with /24 subnets); - downloaded their own files to the
/data/coolify/source/folder; - created the
.envfile containing the secret keys; - It generated an SSH key and wrote the public key to the
/root/.ssh/authorized_keysfile (with the commentcoolify); - downloaded the images (Coolify, PostgreSQL, Redis, supplementary image);
- has launched Coolify.
It is worth noting the following regarding the address range: if the server also uses a private network or VPN with an address in the 10.x.x.x range, this may conflict with Docker networks. The installer accepts other ranges via the DOCKER_ADDRESS_POOL_BASE environment variable.
At the end, the script displays the interface address http://<server-ip>:8000 and two warnings: create the system administrator within 10 minutes, and save the /data/coolify/source/.env file off the server (for example, in a password manager), as backups cannot be restored without the secret keys.
You can also access the interface via an SSH tunnel (ssh -N -L 8000:127.0.0.1:8000 felhasznalo@szerver-ip, followed by http://localhost:8000). Port 6001 handles live updates, while port 6002 serves the web terminal; if you require these as well, please forward them too.
System administrator and initial setup
On the first page (Create the root account for this instance), enter a name, an email address and a password of at least 8 characters, containing lowercase and uppercase letters, numbers and special characters. If you do not create the account within 10 minutes, run the command sudo docker restart coolify and try again. Once created, public registration will be disabled (Settings › Advanced: “Registration disabled”).
The ‘Beginner’ wizard (Welcome to Coolify, Continue) prompts you to select a server. This machine selects Coolify’s own server; at this point, the Traefik proxy also starts up (in the test, with the traefik:v3.7 image, on ports 80, 443 and 8080). Port 8080 could be used by the Traefik control panel, but by default (with --api.insecure=false) it is not accessible; in the test, there was no response on this port; do not open it on the firewall. The wizard then creates the first project (My First Project) in the production environment. You can skip the wizard by clicking the Skip setup button; the server and project will still be retained.
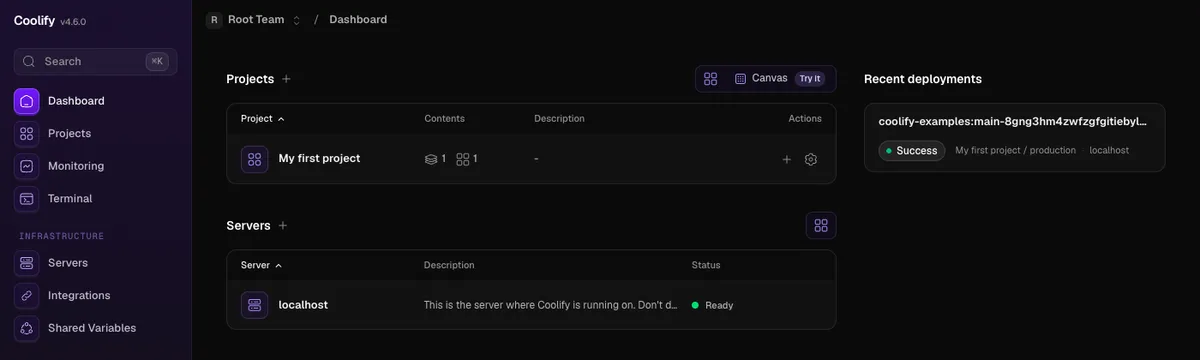
Installing your first application
In the project’production environment, the New Resource button (or Add Resource in an empty environment) takes you to the resource selector. Here you can choose:
- Applications: public Git repository, private repository with an installation key, via GitHub, GitLab or Gitea (with automatic deployment after every push), Dockerfile, Docker Compose or a ready-made Docker image;
- Databases: PostgreSQL, MySQL, MariaDB, Redis, KeyDB, Dragonfly, MongoDB, ClickHouse and (experimental) SQLite;
- Services: nearly four hundred one-click templates, such as Uptime Kuma, n8n and WordPress.
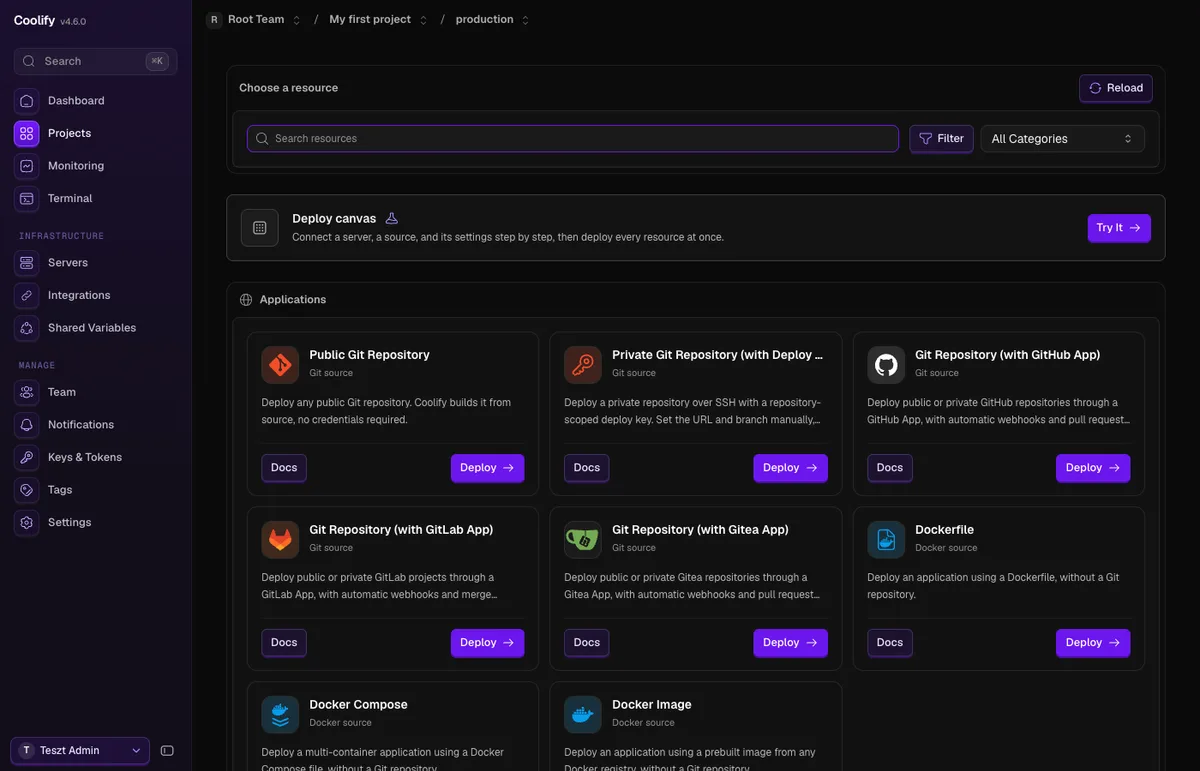
For the test, we installed a static page from the Coolify examples. On the Public Git Repository tab, click the Deploy button, enter the repository address https://github.com/coollabsio/coolify-examples, then click Check Repository. Coolify fetches the default branch and suggests a build pack:
- Railpack: recognises the language and framework (Node.js, PHP, Python, Go, etc.) and builds an image without a Dockerfile; this is the default setting;
- Nixpacks: the predecessor to Railpack; the interface is now marked as deprecated;
- Static: static files served via Nginx;
- Dockerfile and Docker Compose: based on the file in the repository.
The Base directory is a folder within the repository (/static in the test), and the Port is the one on which the application listens within the container.
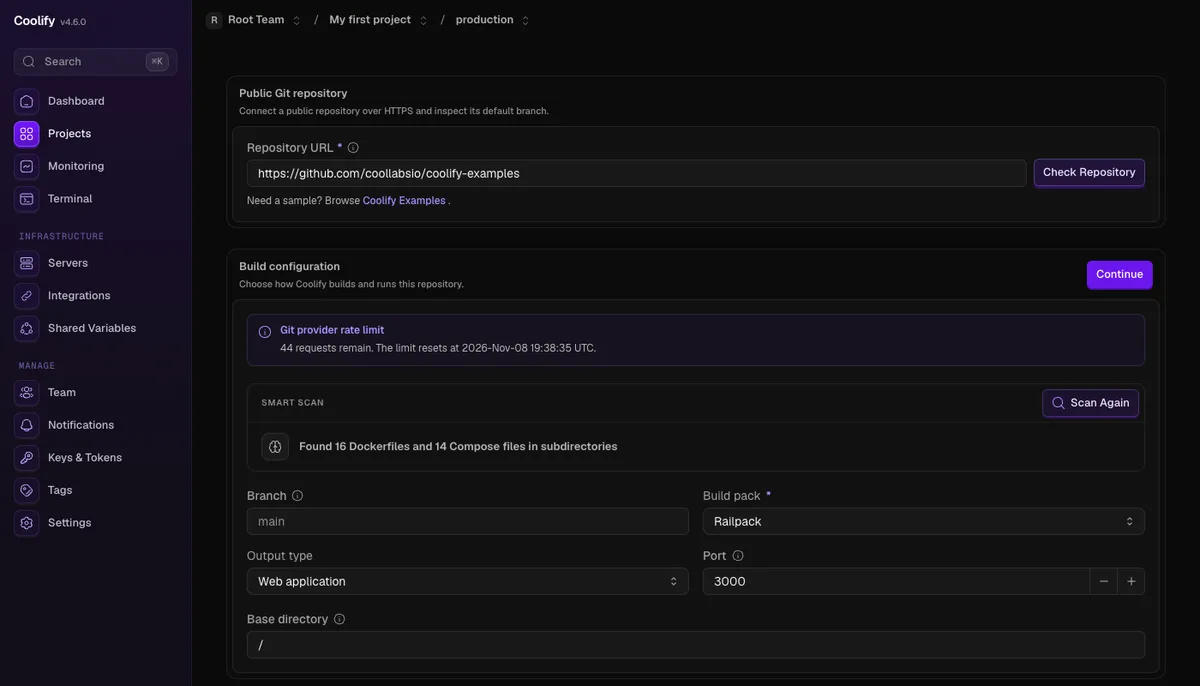
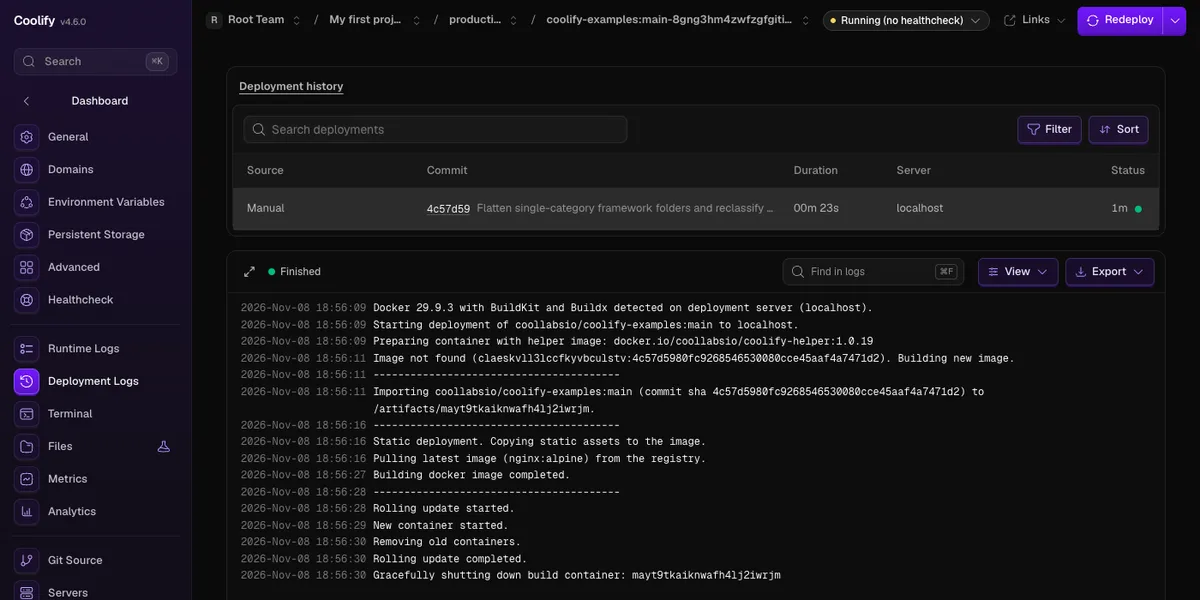
After clicking Continue, you are taken to the application’s settings page, where the Deploy button in the top right-hand corner starts the build. In our test, it took 23 seconds: Coolify downloaded the repository, built the image and launched the new container using a ‘rolling update’. You can follow every step on the Deployment Logs page.
The application is automatically assigned a temporary address via the sslip.io service http://<id>.<server-ip>.sslip.io, which allows you to test it immediately, even without a domain. The image shows an example address instead of the server’s IP address.
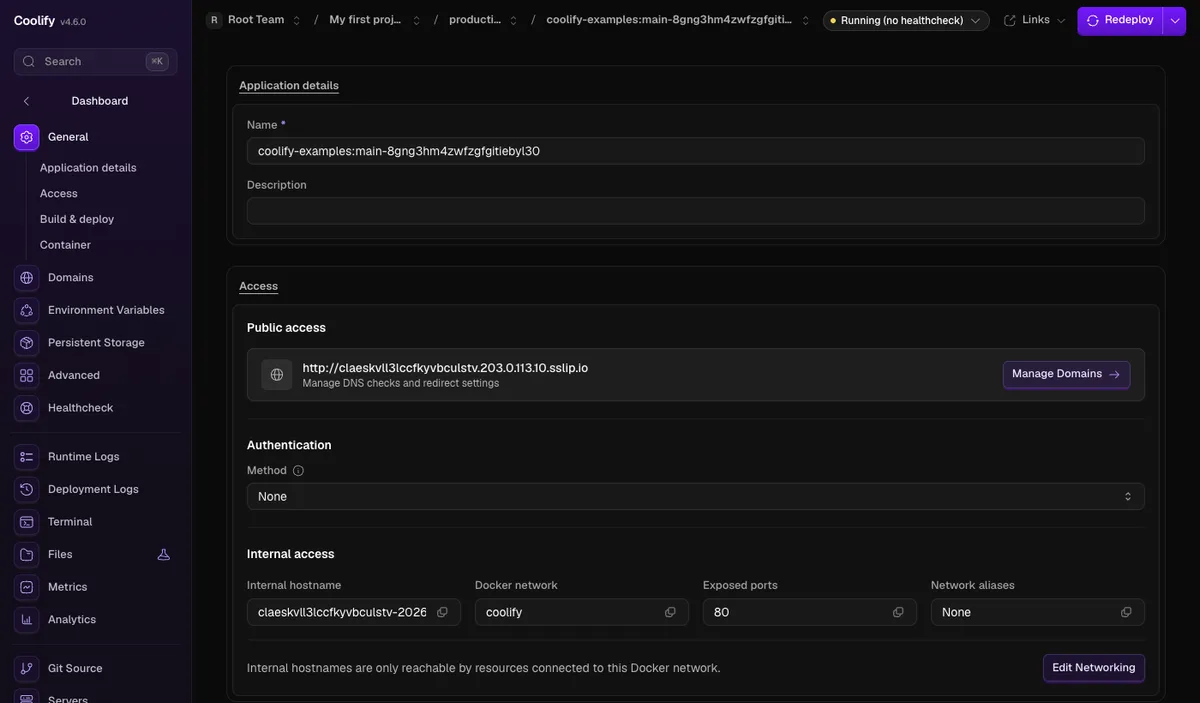
According to the documentation, for your own domain, you should point the domain’s A record to the server’s IP address, then enter the address in the application’s Domains settings with the https:// prefix (for example, https://app.pelda.hu); Traefik will then request a Let’s Encrypt certificate for it. We did not test this step because the test machine was not accessible via a public IP address. According to the documentation, if you assign a domain to the Coolify interface as well, ports 8000, 6001 and 6002 can be closed on the firewall; the interface will then be accessible via port 443 using HTTPS.
Security and updates
- Two-factor authentication: in the user menu at the bottom left, on the Profile page, enable Two-factor authentication › Configure 2FA (using an authentication app). Passkeys can only be used on HTTPS domains or
localhost; they cannot be used with IP addresses. - Update: On the Settings › Updates page, ‘Automatic updates’ was enabled after the latest installation, so Coolify updates automatically. If you disable this, the update can be initiated from the same page within the interface. According to the documentation, it can be updated via the command line using the
upgrade.shscript by specifying the target version; re-running theinstall.shscript is not recommended for updating. - Telemetry: on the Settings › Advanced page, Anonymous telemetry is enabled by default; it can be disabled there.
- Firewall: the provider’s firewall or the server only leaves ports 22 (SSH), 80 and 443 open; ports 8000, 6001 and 6002 remain open only until a domain is assigned to the interface. Please note that ufw does not block the ports published by Docker.
Removing Coolify
We tested each step in the documentation. Uninstalling Coolify does not delete the applications and databases installed with it; these continue to run (however, without the proxy, their domains will not work). First, back up your data, then:
sudo docker rm -f coolify coolify-db coolify-redis coolify-sentinel coolify-proxy
sudo docker volume rm coolify-db coolify-redis
sudo docker network rm coolify
sudo rm -rf /data/coolify
A coolify-proxy-error-pages container has also remained from the test; please delete this separately (sudo docker rm -f coolify-proxy-error-pages). The command docker network rm coolify will return an error (‘network coolify has active endpoints’) as long as a container for an application installed via Coolify is connected to the network: please delete or move these first. You can delete the images using the sudo docker images command, and revoke the Coolify SSH key by deleting the line ending in coolify from the /root/.ssh/authorized_keys file.
Alternatives
We have not tested these; the description is based on their documentation.
- Dokploy: a self-hosted PaaS similar to Coolify (Traefik proxy, deployment from a Git repository, databases, multiple servers with Docker Swarm).
- Komodo: manage Docker containers and Compose stacks across multiple servers from a single interface, including from a Git repository (GPL-3.0 licence).
- Yacht: a simple, template-based Docker interface; before installation, check how active its development is.
- Cockpit and cockpit-podman: the web-based server management tool for Red Hat-based systems (AlmaLinux, Rocky Linux) (running on port 9090 by default) with an extension for managing Podman containers (run
sudo dnf install cockpit cockpit-podman). It manages Podman, not the Docker Engine.
Which one should you choose?
- Portainer CE is ideal if you want to view and manage all aspects of Docker (containers, images, volumes, networks) from a single interface, and you don’t mind that the stacks created within the interface reside in Portainer’s volume.
- Dockge is ideal if you work with Compose files and simply want a lightweight, fast interface for them – the stacks will work just as well without it. It fits on even small machines.
- Coolify, if you want to install from a Git repository, with automatic HTTPS, databases and backups, and are dedicating an entire server to this.
Portainer and Dockge run alongside Docker even on the smallest VPS; memory requirements are determined by the applications. For Coolify, at least 4 GB of memory and 40 GB of disk space are recommended, for example the AMD VPS 4 plan (2 vCPUs, 4 GB, 40 GB NVMe), as building images uses memory and disk space in addition to that required by the containers themselves. A practical example of application deployment using Docker Compose is demonstrated in our guide on installing n8n on a VPS.