 English
 Magyar
 Deutsch



A WordPress caching plugin saves the finished HTML pages to files, so visitors do not have to wait for WordPress to regenerate the page. However, in most cases, PHP still needs to run in order to serve the cached page. CloudLinux MAx Cache is an Apache web server module that serves these cached files directly, without having to start PHP. This reduces the time to first byte (TTFB), and cached pages consume virtually nothing of the hosting plan’s CPU and memory resources, meaning the plan can serve more visitors even on a busy day, and the website responds more quickly.
MAx Cache is installed at server level on our cPanel hosting and WordPress hosting servers: you can use it free of charge with every cPanel hosting plan (from cP Start onwards) and with all WordPress hosting plans. It works with two caching plugins:
- AccelerateWP: CloudLinux’s own WordPress accelerator, available in our WordPress hosting plans. This is the simplest way to set it up – MAx Cache is a single switch in its settings.
- W3 Total Cache: version 2.11.0 or later, with the Disk: Enhanced page cache. This allows you to use MAx Cache with any cPanel hosting plan (including WordPress hosting).
MAx Cache does not serve the cache of other caching plugins (such as WP Super Cache, WP Fastest Cache, LiteSpeed Cache or WP Rocket). Please use only one caching plugin on a website at a time.
MAx Cache with AccelerateWP
AccelerateWP is available as part of the WordPress hosting plans; on cPanel hosting, use W3 Total Cache (see below). To do this, AccelerateWP must be enabled on the website. If you haven’t enabled it yet, the article on AccelerateWP provides step-by-step instructions.
- Log in to the WordPress admin panel and go to Settings › AccelerateWP (or select AccelerateWP › Settings from the top toolbar).
- From the tabs on the left, select ADD-ONS (‘Add more features’).
- In the MAx Cache box, set the Add-on status switch to ON.
The settings are saved immediately; there is no separate save button on this tab. AccelerateWP inserts the MAx Cache settings into the website’s .htaccess file, between its own # BEGIN AccelerateWP and # END AccelerateWP lines, and from then on, MAx Cache serves AccelerateWP’s cache files, with a separate mobile version for mobile visitors.
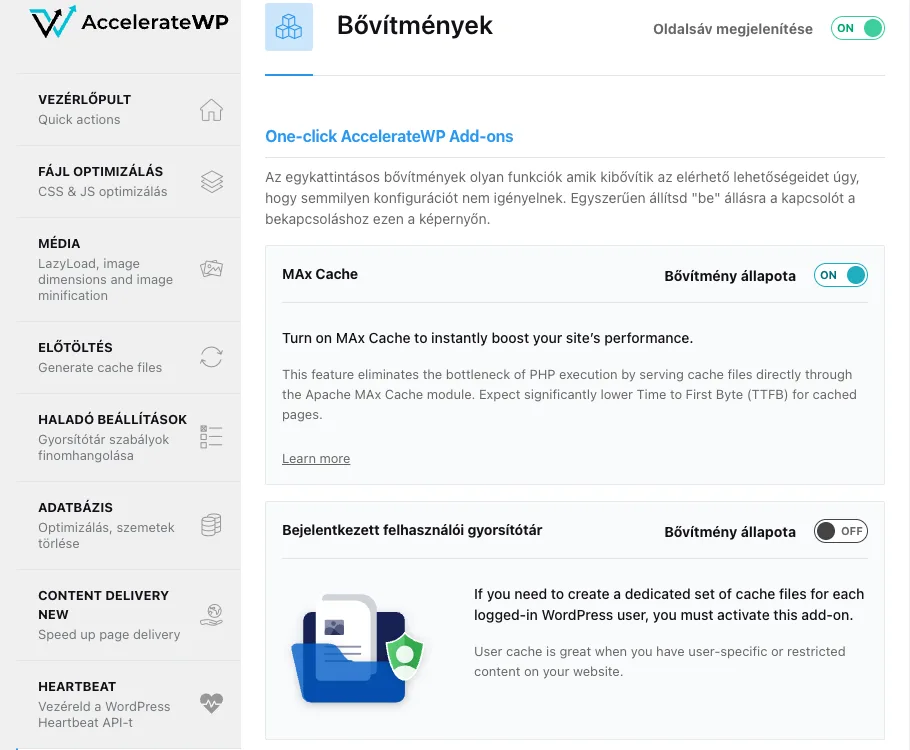
On the same tab, the User Cache add-on creates a separate cache for logged-in users. These pages are not served by MAx Cache (see below); logged-in users receive them via PHP.
MAx Cache with W3 Total Cache
W3 Total Cache is a free WordPress plugin; support for MAx Cache has been included since version 2.11.0, so you do not need to install a separate plugin. If AccelerateWP is enabled on your website, you must first disable it via the cPanel AccelerateWP interface (Disable AccelerateWP), as the two caches cannot run simultaneously.
1. Installing W3 Total Cache
In the WordPress admin panel, select Plugins › Add Plugin, search for W3 Total Cache, click Install Now, then Activate. You can also install it via WP Toolkit (managing plugins in WP Toolkit). If the plugin is already installed, check on the Plugins page that it is at least version 2.11.0, and if not, update it.
The plugin appears in the left-hand menu of the WordPress admin panel under the name Performance. When you open it for the first time, the W3 Total Cache Setup Guide wizard will launch; you can skip this by clicking the SKIP button.
2. Permalinks
The Disk: Enhanced cache only works with ‘pretty’ permalinks. If WordPress is using the default ‘Plain’ permalinks (in the format ?p=123), W3 Total Cache will not enable the page cache and will display the message: ‘Fancy permalinks are disabled. Please enable it first, then re-attempt to enabling enhanced disk mode.’ On the Settings › Permalinks page, select a different format, such as Post name, and save. On a live site, this will also change the old URLs, so it is best to do this when the site is first launched.
3. Page Cache: Disk: Enhanced
- Open the Performance › General Settings page.
- In the Page Cache box, tick the Enable tick box in the Page Cache row.
- In the Page Cache Method list, select Disk: Enhanced (this is the default setting for new installations).
- Click the Save Settings button below the box.
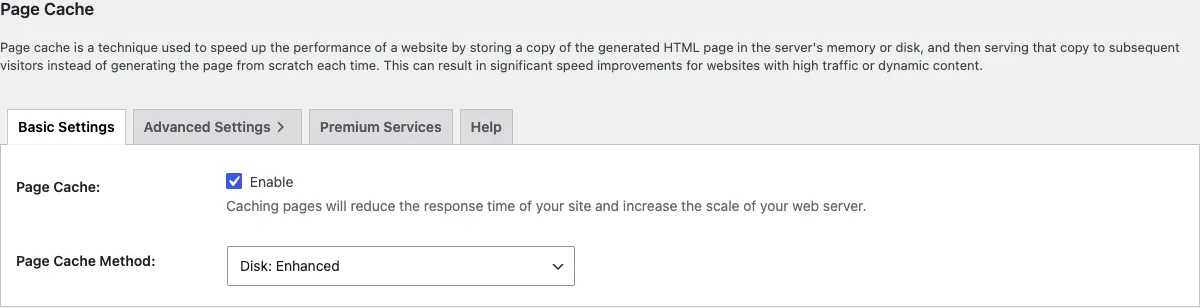
After saving, the message “The CloudLinux MAx Cache module on this server can serve your Disk: Enhanced page cache before PHP starts.” indicates that MAx Cache is available on the server.
With MAx Cache, the other caching features of W3 Total Cache (Minify, Database Cache, Object Cache) are not required. According to the plugin’s own warning, Database Cache and Object Cache, when using disk storage, tend to slow things down and create a large number of files; therefore, you should leave these disabled.
4. Enabling the MAx Cache add-on
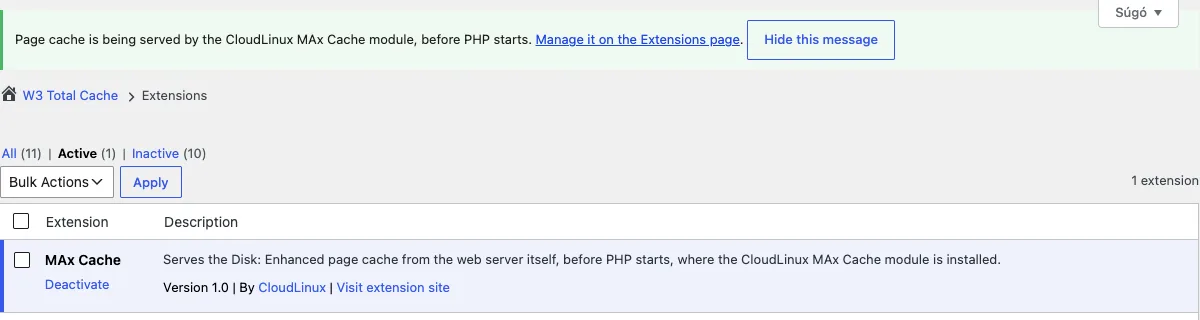
- Go to the Performance › Extensions page.
- Look for the MAx Cache entry in the list (“Serves the Disk: Enhanced page cache from the web server itself, before PHP starts…”), and click on the Activate link below it.
Once enabled, the Deactivate link appears in the list, and the message ‘Page cache is being served by the CloudLinux MAx Cache module, before PHP starts’ is displayed at the top of the page. The add-on writes its settings to the .htaccess file, between the lines # BEGIN W3TC Page Cache MAx Cache and # END W3TC Page Cache MAx Cache; do not edit these manually.
If the row shows “Disabled: see Requirements” instead of Activate, the Requirements line below the description will specify the reason, for example: “Page Cache is not set to ‘Disk: Enhanced’, so there are no cache files that the web server module could serve.” In this case, please check steps 2 and 3.
What does MAx Cache serve, and what does it not serve?
MAx Cache only serves what the plugin has already cached, and only if the request is cacheable. These are still generated via PHP in the usual way:
- pages intended for logged-in WordPress users, password-protected posts and visitors who have already submitted a comment (these are indicated by a cookie),
- requests containing unknown query parameters (the part following the
?); MAx Cache ignores campaign tracking parameters (such asutm_source,gclid,fbclid), so these URLs are also served from the cache, - the WordPress admin panel, the login page, the REST API (
wp-json) and feeds, - The first time a page is opened after the cache has been cleared, until the plugin has rebuilt it (AccelerateWP does this in the background whilst pre-loading).
Mobile visitors also access the site from the cache.
How can you check that it is working?
The caching plugin indicates that the page is being served from the cache via a comment added at the end of the source code (“Performance optimized by AccelerateWP” or “Page Caching using Disk: Enhanced”), but this does not reveal whether it was served by MAx Cache or PHP. Therefore, our servers add the X-CL-Served: 1 header to every response served by MAx Cache. You do not need to configure anything for this.
- Open the page in a private browser window twice in succession (the first time you open it may create a cache file).
- In your browser’s developer tools (F12, or Cmd+Option+I on a Mac), click on the page itself (the first line in the list, marked as a document) in the Network tab, and view the response headers. If the page was served by MAx Cache, you will see the line
x-cl-served: 1amongst the headers.
The equivalent command-line command is: curl -sI https://pelda.hu/ | grep -i x-cl-served.
If the header does not appear, check that you are not logged in (which is why using an incognito window is important), that there are no query parameters in the URL, and that the plugin’s MAx Cache block is present in the website’s .htaccess file (see above).
Deactivation
- AccelerateWP: on the ADD-ONS tab, switch the MAx Cache toggle to OFF. AccelerateWP will remove the MAx Cache settings from the
.htaccessfile; the cache will continue to function, but the pages will be served by PHP again. - W3 Total Cache: on the Performance › Extensions page, click the Deactivate link below the MAx Cache row. The add-on removes its own block from the
.htaccessfile.
Troubleshooting
- A change does not show up for visitors. MAx Cache serves the same files as the plugin, so clearing the plugin’s cache is enough: for AccelerateWP, select AccelerateWP › Clear and Preload Cache in the top toolbar; for W3 Total Cache, click the Empty All Caches button on the Performance › General Settings page. If the site is behind Cloudflare or another CDN, clear its cache as well.
- The W3 Total Cache add-on does not activate and reports an incomplete block. If the
# BEGIN W3TC Page Cache MAx Cacheblock in the.htaccessfile is incomplete (for example, following manual editing), the add-on reports this and does not proceed. Delete the lines of the block, save the file, then activate the add-on again. - The content of a page varies depending on the visitor (for example, based on a currency or language selection cookie). Exclude such pages from the plugin’s cache (AccelerateWP: ADVANCED RULES tab, W3 Total Cache: Performance › Page Cache), because anything that is not cached will not be served by MAx Cache either.
If the problem persists, please contact us and provide the website address and the caching plugin you are using.