 English
 Magyar
 Deutsch



When performing a website migration, activating a developer copy or restoring an old backup, the database must be exported as an SQL file and then imported. On cPanel hosting, phpMyAdmin is used for this; for larger databases, if your plan includes SSH access, the command-line mysql client can be used. Our hosting servers run MariaDB 10.11, which is compatible with MySQL.
The phpMyAdmin interface is described in more general terms in our blog post introducing the basics of phpMyAdmin.
Opening phpMyAdmin
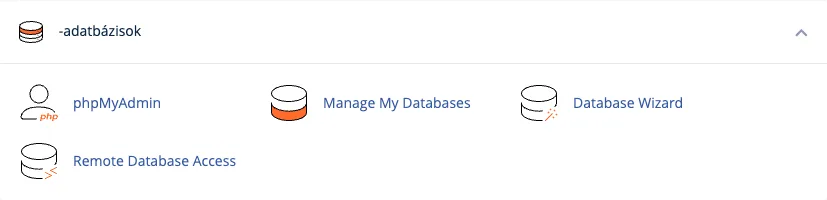
Log in to cPanel and, in the Databases section, click on the phpMyAdmin icon. phpMyAdmin opens using your cPanel account details, without the need for a separate password, and displays all the databases associated with your account on the left-hand side.
Exporting a database
- In the list on the left, click on the name of the database you wish to export, then click on the Export tab at the top.
- Leave the Export method at Quick - display only the minimal options and the Format at SQL.
- Click the Export button. Your browser downloads a
.sqlfile named after the database.
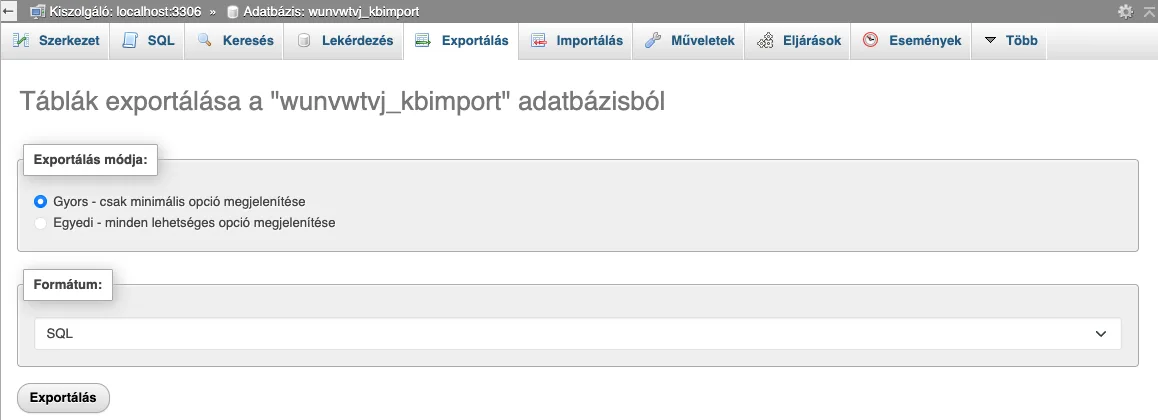
For a larger database, choose Custom - display all possible options, and under Output select gzipped in the Compression list: a text SQL file usually shrinks to a fraction of its size when compressed, and phpMyAdmin can import it in this form too. In custom mode you can also leave out individual tables.
If you are going to import the database into a database with a different name (in cPanel every database name starts with the username), leave the Add CREATE DATABASE / USE statement switch of the custom mode off. This is the default.
aWh also performs automatic backups of the storage space; the article on JetBackup restoration explains how to restore a database to a previous state.
Importing an SQL backup
Importing loads the contents of the file into an existing database. If you do not yet have a database, you must first create one along with a user (creating a database and user in cPanel).
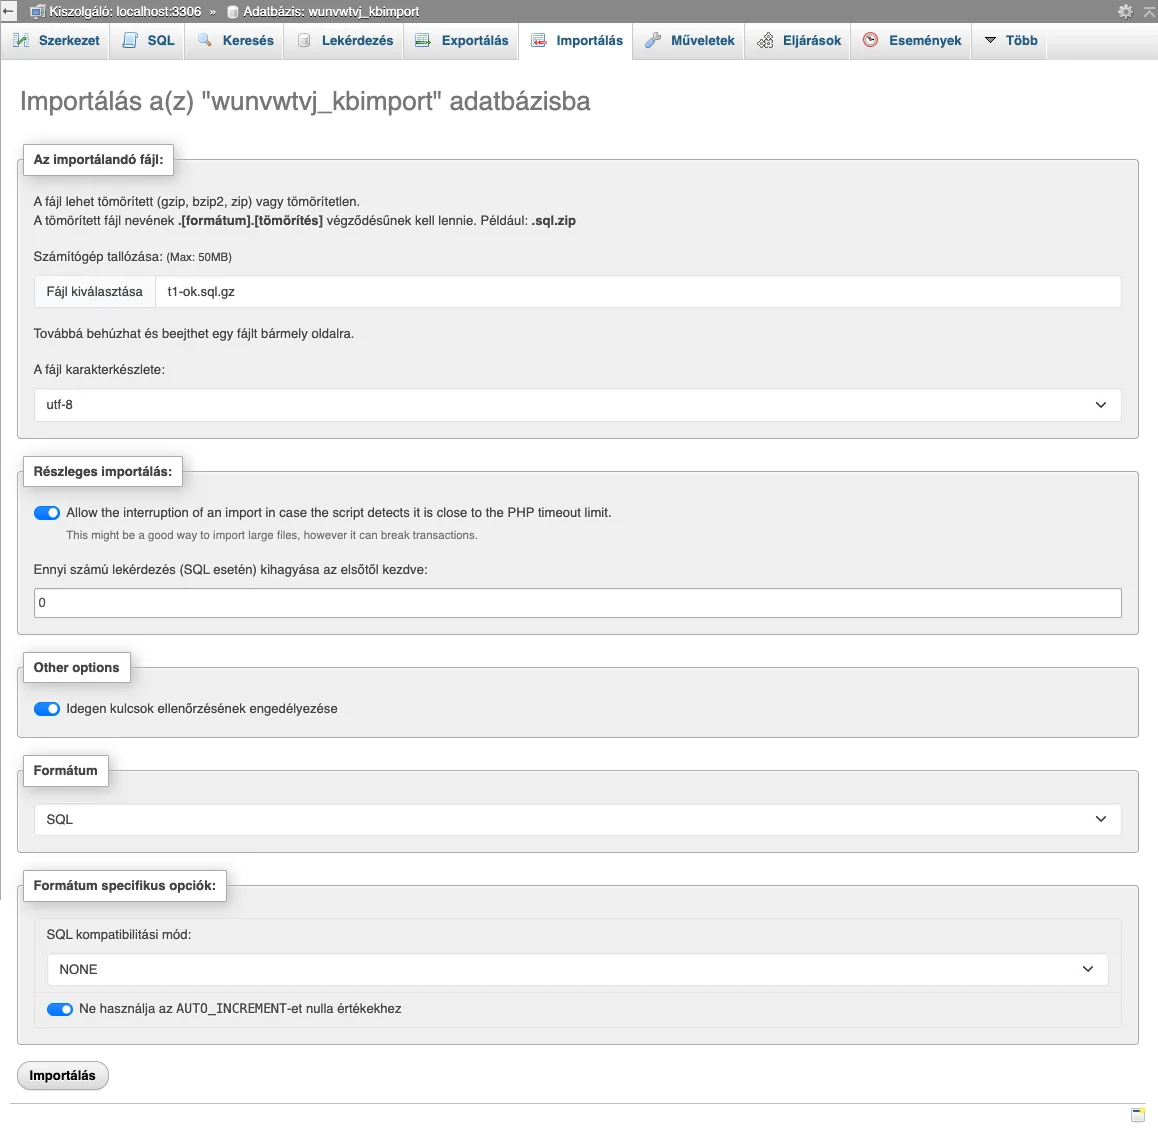
- In the list on the left, click on the target database, then click on the Import tab.
- Select the backup with the Choose File button. You can also upload a compressed file (gzip, bzip2, zip) if its name ends in
.sql.gz,.sql.bz2or.sql.zip. The upload limit is 50 MB, as the (Max: 50MiB) label shows; compress a larger backup or import it over SSH (see below). - Leave Character set of the file at utf-8 and the Format at SQL.
- Click on the Import button at the bottom of the page.
After a successful import, a green bar shows the message “Import has been successfully finished, N queries executed.”, with the executed statements below it.
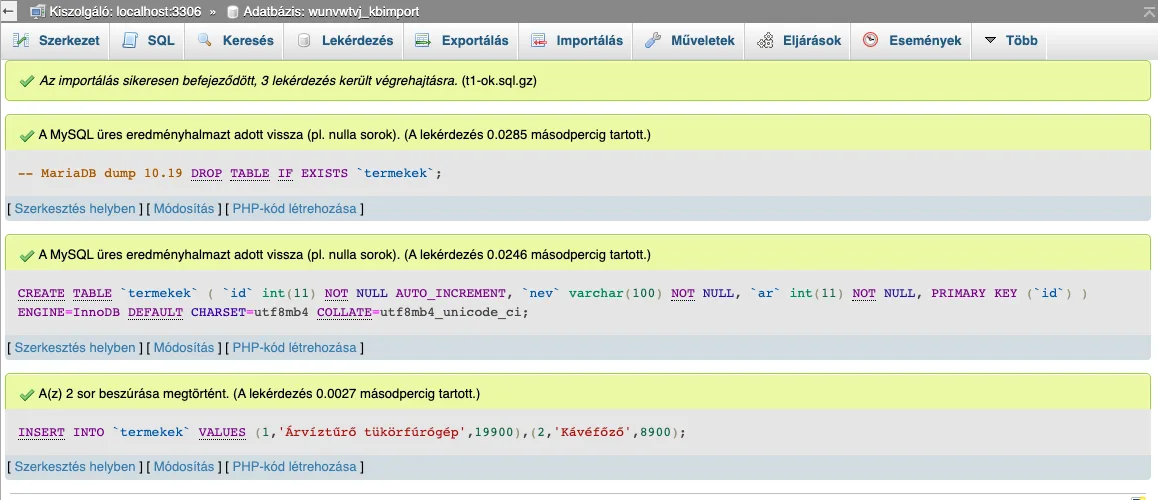
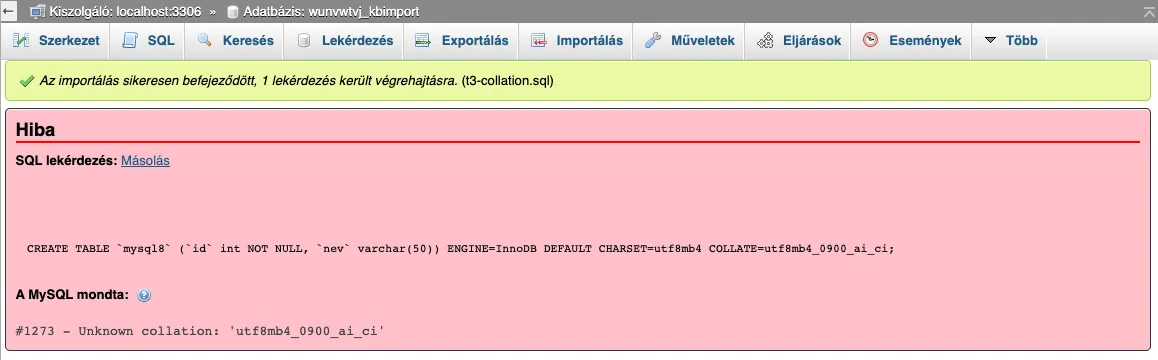
Note: the green bar also appears when an error occurred during the import. In that case a red Error box is shown below it, with the failed statement and the error code after MySQL said:, and the import stopped at that statement. Always scroll through the whole result. You will find the most common error codes below.
If a large import is interrupted due to a time-out, because the Partial import option is enabled by default, phpMyAdmin will note how far it has got and will resume from that point once the file is selected again. However, it is safer to use the compressed file or SSH.
After loading the WordPress database
If you have imported the database of a WordPress site into a new database, update the DB_NAME, DB_USER and DB_PASSWORD values in the wp-config.php file to match the new database details, and ensure that $table_prefix matches the prefix of the imported tables. If the domain has also changed, replace the old URLs using the wp search-replace command, not by editing the SQL file directly with a text editor. The entire migration process is described in the article on migrating a WordPress site.
Importing a CSV file into a table
You can import data backed up from a spreadsheet program (Excel, LibreOffice Calc, Google Sheets) in CSV format into an existing table.
- Open the table in the list on the left, then click on the Import tab.
- Select the CSV file; the format must be CSV.
- If the first line of the file contains column names, enter 1 in the Skip this number of queries (for SQL) starting from the first one field. For CSV this skips the first lines of the file; if it stays 0, the header row is imported as a data row too.
- Under Format-specific options, the default of the Columns separated with field is a comma (
,). Excel with many European regional settings (Hungarian, German and others) saves CSV files with a semicolon (;): in that case enter that in the field. - Click the ‘Import’ button.
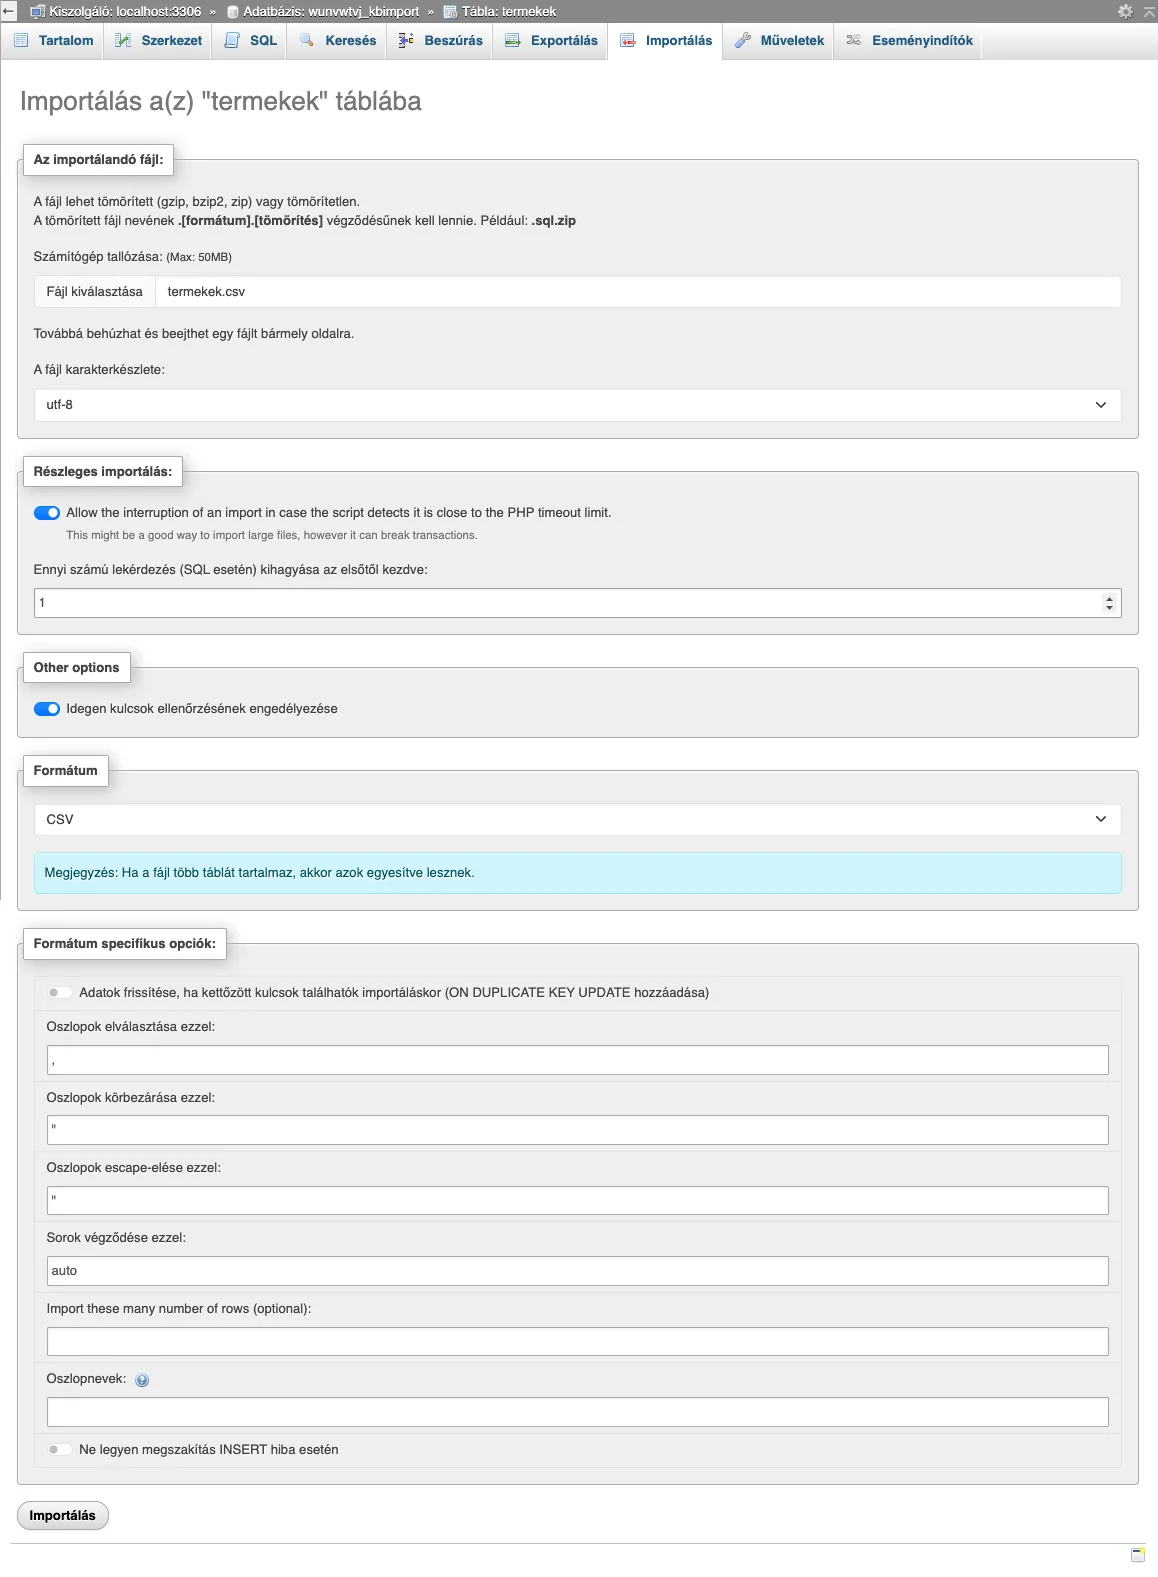
The order of the CSV columns must match the columns of the table. If it differs, or the file has fewer columns, list in the Column names field, separated by commas, which CSV column goes into which table column. If your spreadsheet program offers it, save the file as “CSV UTF-8”, otherwise accented letters will be garbled.
Importing and exporting via SSH
If your package includes SSH access (cP Premium, cP Pro, cP Pro 100), you can also load the SQL backup using the command-line mysql (or its equivalent, mariadb) client. This has no 50 MB limit and does not time out, making it the ideal method for databases running into several hundred megabytes. You’ll need an SSH key to log in; the article on SSH keys explains how to set this up.
- Upload the backup via SFTP to a directory on your hosting account, outside the
public_htmlfolder, so that it cannot be downloaded via a web browser. -
Log in via SSH and upload the file using the database user. Enter the password when prompted with
Enter password:so that it is not recorded in the command line history:mysql -u felhasznalo_wp -p felhasznalo_wp < mentes.sqlYou can upload a compressed backup without extracting it:
zcat mentes.sql.gz | mysql -u felhasznalo_wp -p felhasznalo_wp - If the command returns without a message, the upload was successful. In the event of an error, the client stops at the first faulty instruction and displays the error code and line number, for example,
ERROR 1062 (23000) at line 1: Duplicate entry '1' for key 'PRIMARY'.
The first, felhasznalo_wp, is the database user name; the second is the database name. In cPanel, both begin with the hosting account username. You can export the data using the mysqldump command:
mysqldump -u felhasznalo_wp -p --single-transaction felhasznalo_wp | gzip > mentes.sql.gz
The --single-transaction switch creates a backup of InnoDB tables without locking them, in a consistent state, so the website continues to function while the backup is in progress. With WordPress, the wp db import and wp db export commands do not work on the hosting server because the functions required for this are disabled in PHP; use the commands above instead (WP-CLI on cPanel hosting).
If you wish to import data from your own computer using a graphical tool (HeidiSQL, DBeaver, MySQL Workbench), you must enable remote access to the database.
Common import errors
| Error message | What causes this? | Solution |
|---|---|---|
#1044 - Access denied for user '…' to database '…' |
At the start of the backup, there are CREATE DATABASE and USE statements with a different database name, to which the account does not have access. |
Delete these two lines from the file, and select the target database in phpMyAdmin first. When exporting, leave the Add CREATE DATABASE / USE statement switch off. |
#1273 - Unknown collation: 'utf8mb4_0900_ai_ci' |
The backup was created from MySQL 8 and uses a collation that is not recognised by MariaDB 10.11. | Replace the text utf8mb4_0900_ai_ci with utf8mb4_unicode_ci wherever it appears in the file. |
#1227 - Access denied; you need (at least one of) the SUPER, SET USER privilege(s) for this operation |
The views, triggers or stored procedures are defined on behalf of another user, for example DEFINER=`root`@`localhost`. |
Delete the sections containing DEFINER=…; the imported object will then belong to the user performing the import. |
#1062 - Duplicate entry '…' for key 'PRIMARY' |
There are already rows in the table with the same ID. | Import into an empty database, or turn on Add DROP TABLE / VIEW / PROCEDURE / FUNCTION / EVENT / TRIGGER statement when exporting. |
| The file is too large, or the upload has been interrupted | The backup is larger than 50 MB, or is taking too long to load. | Compress it using gzip, or upload it via SSH. |
Via SSH, the first two replacements can be carried out with a single command each, while the original file remains unchanged:
sed 's/utf8mb4_0900_ai_ci/utf8mb4_unicode_ci/g' mentes.sql > javitott.sql
sed -E 's/DEFINER=`[^`]+`@`[^`]+`//g' mentes.sql > javitott.sql
You can then import the corrected file in the usual way.