 English
 Magyar
 Deutsch



SPF, DKIM and DMARC records prove to receiving mail servers that emails sent on behalf of your domain are genuinely from you. Gmail, Outlook.com and other major email providers often place unauthenticated emails in the spam folder or reject them altogether. On cPanel hosting, you can check and correct all three records in one place, on the Email Deliverability page.
The articles on SPF records, DKIM records and DMARC records explain what each record means and how they are structured. This article outlines the steps to be carried out in cPanel.
What does cPanel configure automatically?
For a new domain or subdomain, cPanel automatically creates the DKIM key pair and the SPF record, so in most cases you do not need to do anything about these. The DMARC record, however, is often missing, particularly for subdomains and domains added at a later date. You can add this with a single click, as you will see below.
All of this works automatically if the domain’s DNS zone is managed by the hosting provider, i.e. the domain uses the name servers provided by the hosting provider (you can view these on the ‘Hosting Details’ tab in the client portal). If you manage your DNS elsewhere, for example with Cloudflare or your domain registrar, please read the section on external DNS.
Checking the status
Log in to cPanel and, in the Email section, click on the Email Deliverability icon. The list shows the status for each domain and subdomain:
- Valid: all three records are correct.
- Problems Exist: one of the records is missing or incorrect; you can see which one in brackets, for example (DMARC).
- DNS Errors Occurred: the check could not run, usually because another record (for example DKIM) is wrong. The Manage page shows the reason.
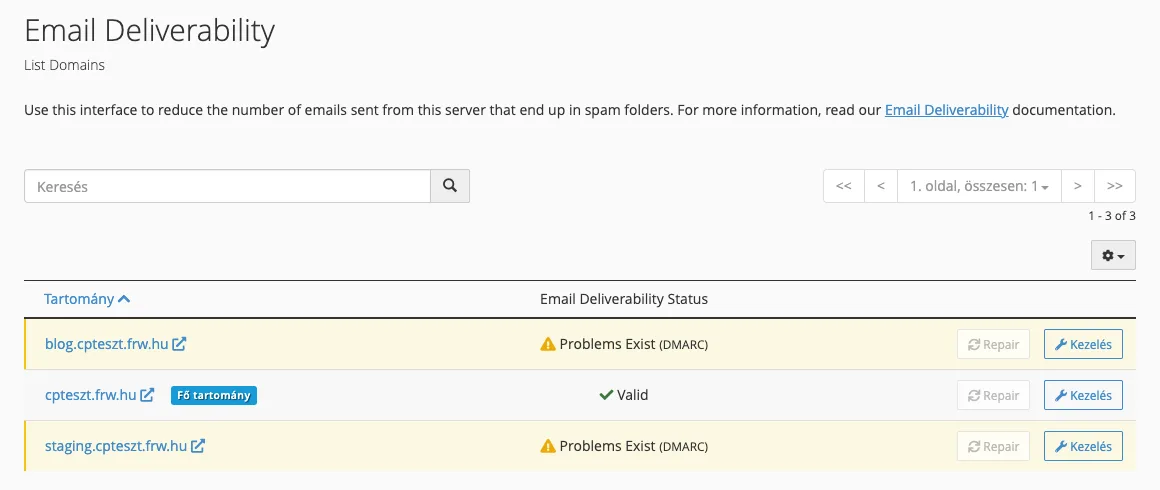
The Repair button at the end of the row sets the incorrect DKIM and SPF records to the values recommended by cPanel. If only DMARC is missing, the button will be greyed out; in this case, please proceed by clicking the Manage button. If you have previously supplemented the SPF record using external services, do not use the Repair button, as it will overwrite your additions with the suggested values: instead, customise the record on the Manage page.
Managing records
The Manage button opens the domain’s details page, where DKIM, SPF and DMARC are listed in separate sections. Next to the VALID indicator, you will see the Name and Value fields for the current record; you can copy them to the clipboard using the Copy link.
Setting up a DMARC record
If the DMARC section shows PROBLEMS EXIST, cPanel will also display a suggested record: v=DMARC1; p=none;. This is the most lenient policy; it does not affect email delivery, but in the eyes of providers checking DMARC, the domain is now considered to have a policy in place. Click the Install The Suggested Record button.
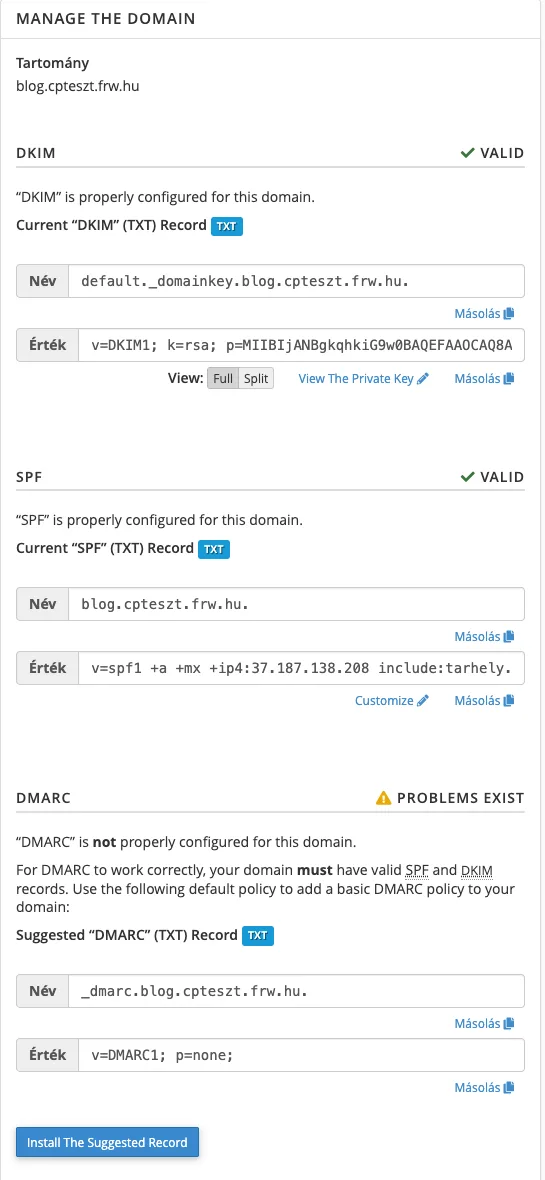
cPanel confirms the installation with the message “Success: The system updated the “DMARC” record…”. In our test the record appeared on the nameservers within half a minute; the status list sometimes switches to Valid only after reloading the page.
p=none is a good start, but it does not protect against spoofing on its own. Once the reports show that all your own mail passes the check, tighten it to p=quarantine and later p=reject by editing the _dmarc TXT record on the Zone Editor page of the Domains group. The gradual rollout is described in the article on the DMARC record and our blog post on setting up DMARC.
Customising SPF for external senders
If not only the hosting account sends mail in the domain’s name but also, for example, a newsletter service, an online shop platform, an invoicing program or Google Workspace, these must be in the SPF record too. A domain can have only one SPF record, so instead of adding a second record, extend the existing one. In the SPF block, click the Customize link.
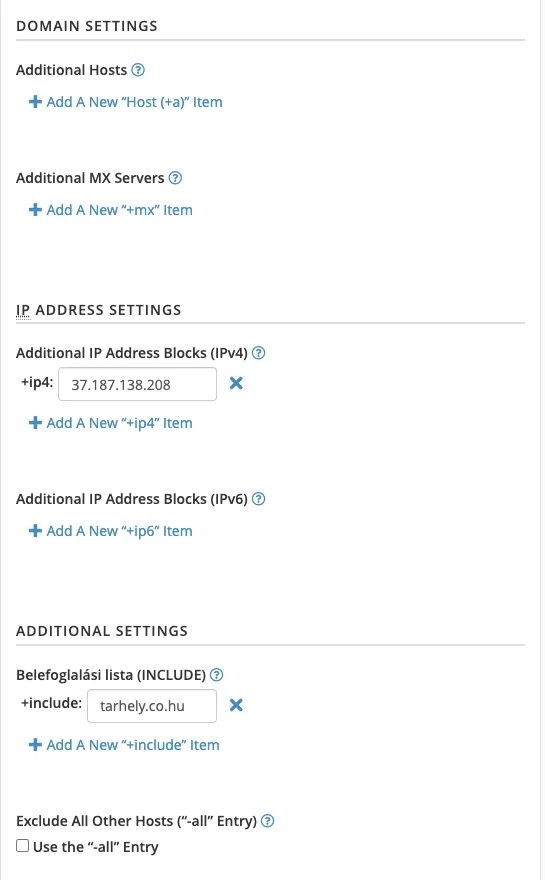
- Add the
includevalue given by the external provider (for example_spf.google.com) in the INCLUDE list with the Add A New “+include” Item link. - If the service provider provides an IP address, enter it in the Additional IP Address Blocks (IPv4) or (IPv6) section.
- The Use the “-all” Entry checkbox tightens the end of the record from
~allto-all: the receiving server may then reject mail from servers not listed. Only turn it on if you are sure you have listed every sender.
At the bottom of the page, under PREVIEW OF THE UPDATED RECORD, you see the new record; the Install A Customized SPF Record button saves it. The record may contain at most 10 DNS lookups (every include, a and mx counts); above that, receiving servers ignore the whole record. You can check the result with our free SPF checker.
If a yellow warning at the bottom of the customisation page indicates that the server is not the domain’s authoritative nameserver (“This system does not control DNS…”), the domain’s DNS is not managed by the hosting provider. In this case, changes made in cPanel will not take effect: the suggested record must be added at the domain’s actual DNS provider, as described in the following section.
The DKIM key
In the DKIM section, you will see a TXT record containing the public key, named default._domainkey. The View The Private Key link displays the private key: never disclose this or copy it anywhere, as anyone could use it to sign emails on behalf of your domain. Only the public record is required in the external DNS.
If the DKIM section displays the warning “The DKIM key for ‘pelda.hu’ does not exist on the local server”, this means there is no private key for the domain on the server; consequently, outgoing emails are sent without a DKIM signature, and the DMARC check also returns an error (DNS ERRORS OCCURRED, “DKIM record not valid”). This can happen, for example, after the main domain has been renamed.
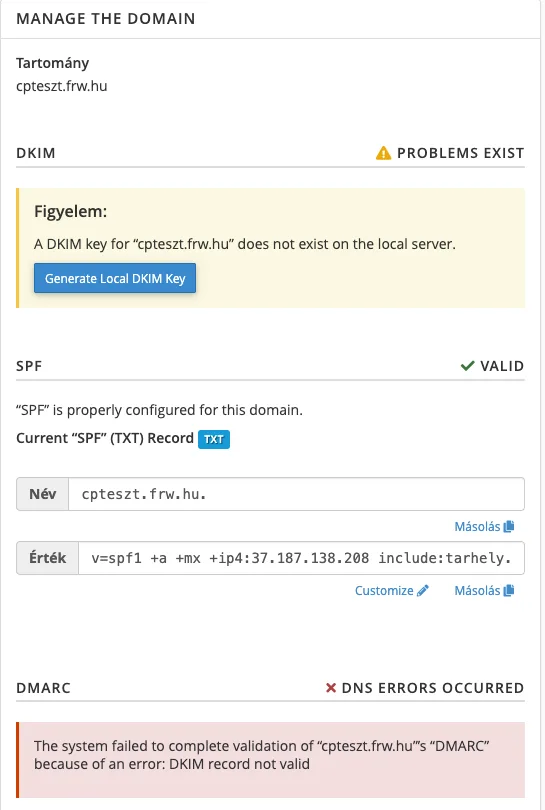
- Click the Generate Local DKIM Key button. cPanel will generate a new key pair.
- The DKIM block then shows a Suggested “DKIM” (TXT) Record with the new public key. Click Install The Suggested Record so that the new key goes into the DNS too.
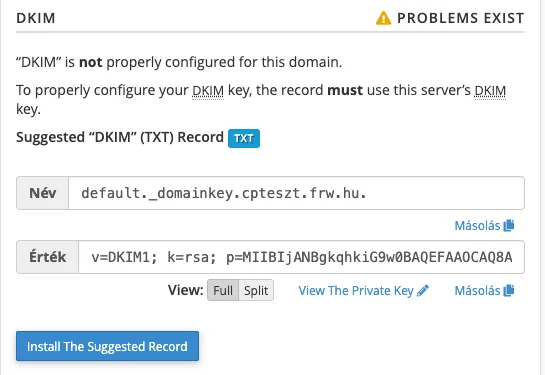
The same recommendation appears if the DKIM record in the DNS does not match the server’s key. The DMARC status will automatically change to VALID once the DKIM has been corrected.
If you manage your domain’s DNS elsewhere
If the domain’s name servers do not belong to the hosting provider, cPanel cannot modify the DNS settings, and the Email Deliverability page will show the status Problems Exist. In this case:
- Open the domain’s Manage page and copy the Name and Value fields of the suggested records with the Copy links.
- For the DKIM record, you can switch between Full and Split in the View: line. Split breaks the long key into 255-character pieces, for DNS providers whose interface does not accept it in one piece.
- Add the records as TXT records with your external DNS provider. If there is already an SPF record there, do not add a second one; instead, supplement the existing one.
- Once the DNS change has propagated (what DNS propagation is), reload the Email Deliverability page.
Verification using a test email
Send a message to a Gmail address, open it, and choose Show original in the message menu. The SPF: PASS, DKIM: 'PASS' and DMARC: 'PASS' lines show that everything is in order. You can also check the records with our free DKIM checker and DMARC checker.
If authentication is correct but emails are still ending up in the spam folder, further reasons are summarised in the article on the spam folder. Our blog post also covers SPF and DKIM settings more generally, while our article on email address spoofing explains how to protect against the forgery of domain email addresses.