 English
 Magyar
 Deutsch



The main domain (primary domain) of a cPanel account is the domain for which the hosting was ordered, and whose website is loaded from the public_html folder. If your business changes its name, you need to correct a misspelt domain, or you are moving to a different extension instead of .hu, the main domain can be changed without having to set up a new hosting account and copy everything over.
Previously only the provider could do this, in the server administration interface. In the cPanel version running on our cPanel hosting plans, you can now do it yourself with the Rename function of the Domains page. Besides the main domain, it can also rename subdomains and other domains.
If you do not wish to replace your domain but would like to add a new one to your hosting account, please refer to the article on adding domains and subdomains. If you simply wish to redirect your old domain to a new one, the article on domain redirection will help.
Before you begin
- The new domain must be registered. The website and email of an account renamed to an unregistered domain will not be reachable. You can also register a new domain with us.
- Point the new domain to the hosting account. Set the domain’s nameservers to the ones that came with your hosting account (you will find them in the client portal, on the Hosting Information tab of your hosting account), or point the domain’s A record to the server’s IP address (A record or nameserver change). AutoSSL can only issue the SSL certificate after that.
- The new domain must not already be added to your account as an additional or alias domain; if it is already there, please remove it first.
- Back up your account (full backup in cPanel).
- Choose a quiet time. Once the domain has been renamed, the old domain will be deactivated from your account immediately: emails sent to the old address will bounce back, and you will need to update your email clients.
Renaming the main domain
-
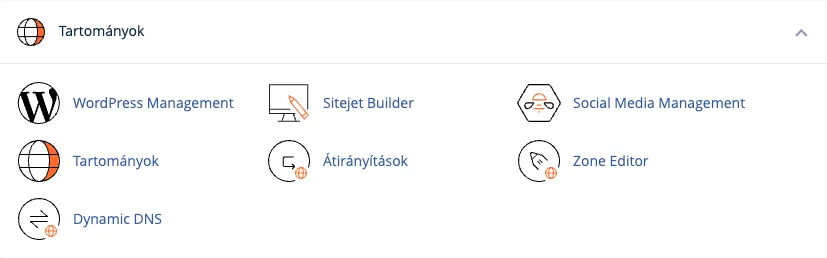
Log in to cPanel and, in the Domains section, click on the Domains icon.
- In the list, click Manage in the row marked Main Domain.
-
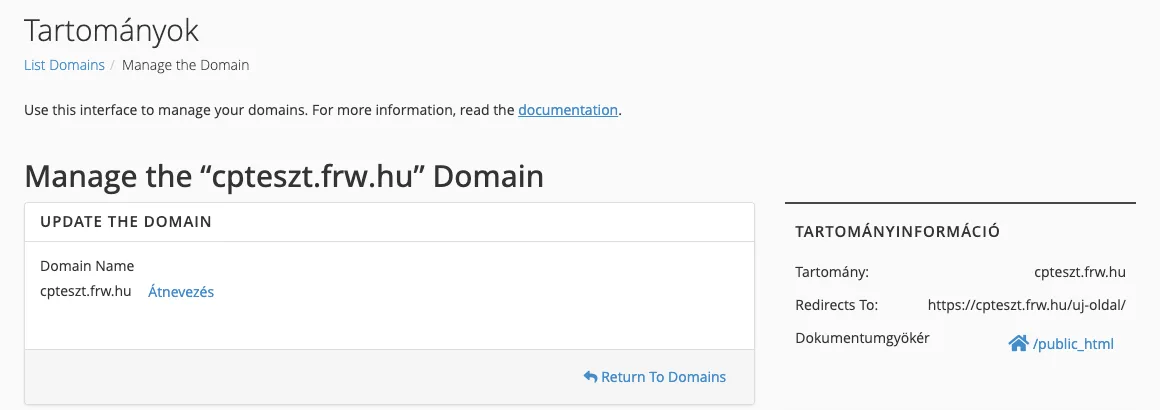
In the UPDATE THE DOMAIN box, under Domain Name, next to the domain name, click on the Rename link.
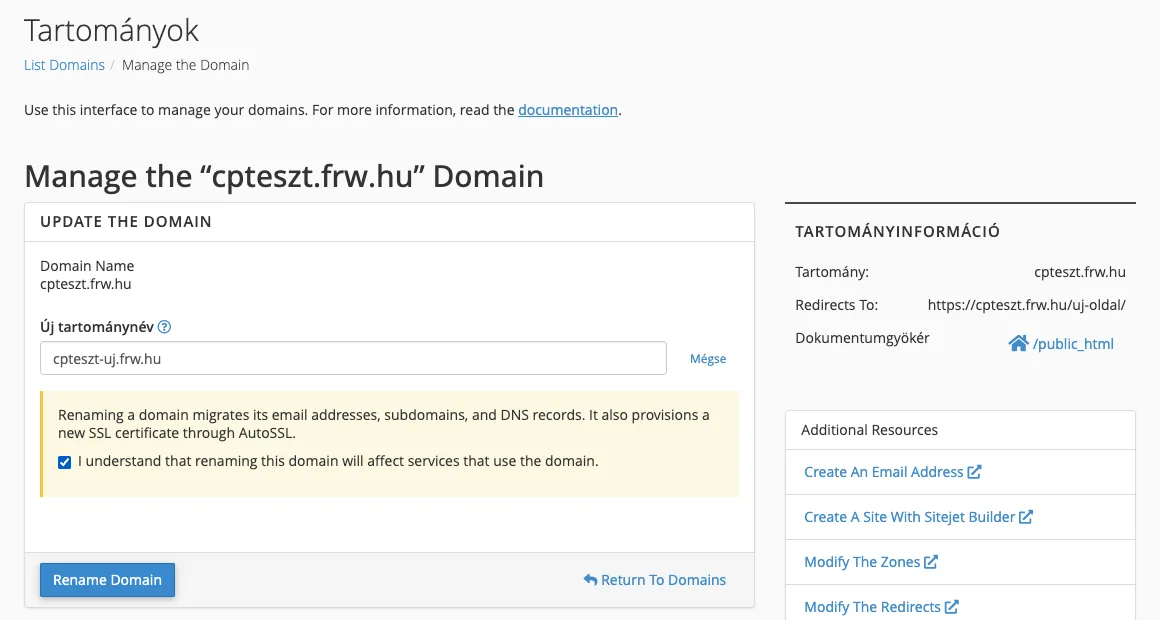
- Enter the new domain in the New Domain Name field (without
www.). - Please read the information in the yellow box: “Renaming a domain migrates its email addresses, subdomains and DNS records. It also provisions a new SSL certificate via AutoSSL.” (Renaming the domain transfers the email addresses, subdomains and DNS records, and requests a new SSL certificate via AutoSSL.) Tick the box marked I understand that renaming this domain will affect services that use the domain.
-
Click on the Rename Domain button.
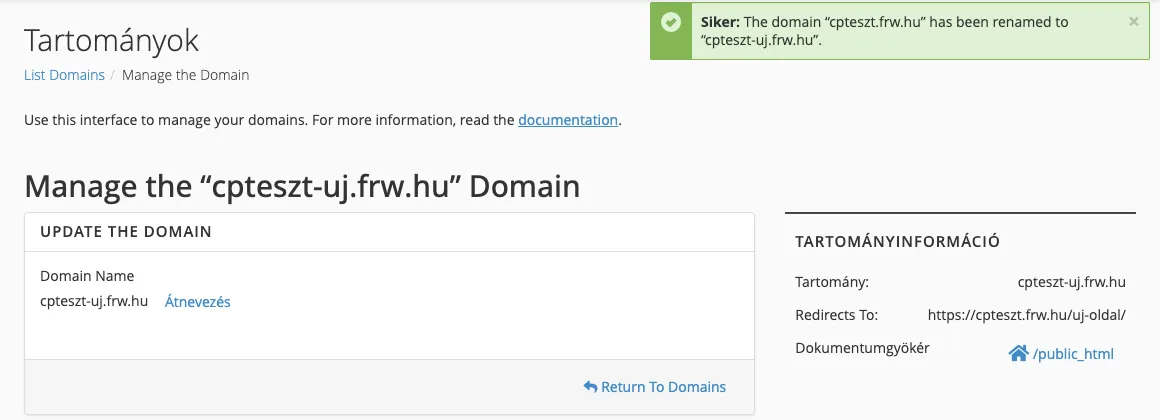
In our test, the renaming process took 10–15 seconds. At the end, the message ‘Success: The domain “old” has been renamed to “new”.’ appears, and the page now displays the new domain.
What is changing and what isn’t?
We tested this feature on a test cPanel account, which included a WordPress site, two subdomains, an email account, a forwarder, an FTP account, databases, a cron job and a redirect. Here is what we found:
| Moves to the new domain | Keeps the old name or does not change |
|---|---|
the main domain and the www. alias |
cPanel username and password |
subdomains (blog.regi.hu → blog.uj.hu) |
the home directory and the public_html folder |
email accounts with the full contents of the mailbox (info@regi.hu → info@uj.hu) |
the name of the subdomain folder (for example, blog.regi.hu) |
| the forwarders | Databases and database users |
FTP accounts linked to the domain (ftp@regi.hu → ftp@uj.hu) |
Cron tasks |
| All records in the DNS zone, including custom TXT records and the DMARC record | the targets of Redirects: a target URL pointing to the old domain stays unchanged |
| The DKIM private key is not transferred; it must be regenerated (see below) | |
| The URLs of WordPress sites registered in the WP Toolkit (the website address and links within posts) | The WordPress administrator’s email address and the users’ email addresses |
| New SSL certificate from AutoSSL | the name of the email archive folder |
The old domain will be completely removed from the account: it will not remain as an alias, the website will no longer load from the storage space, and the server will not accept emails sent to the old email addresses.
Steps to take after renaming
DKIM key: do not overlook this. In our test, the renaming process carried over the old DKIM record to the DNS, but no private key remained on the server. Until this is rectified, outgoing emails will be sent without a DKIM signature and may fail DMARC validation. Open the Email Deliverability page in the Email group: if the DKIM section for the domain and subdomains displays the warning “The DKIM key … does not exist on the local server”, click on Generate Local DKIM Key, then on Install The Suggested Record. The steps are illustrated with images in the article on configuring SPF, DKIM and DMARC.
Email clients. The mailbox passwords do not change, but the username becomes the new email address, and the incoming and outgoing server becomes mail.uj.hu. Change these on every device (computer, phone, tablet), otherwise devices still trying the old settings can even trigger the server firewall’s block. Separate articles show the settings for Outlook, Thunderbird and phones. Log in to webmail with the new email address as well (cPanel and webmail login).
WordPress. If your WordPress site is managed by WP Toolkit, its address will be automatically updated. However, the administrative email address will remain on the old domain, meaning that WordPress notifications and password reset emails would be sent to an address that no longer exists. Update this on the Settings › General page and in the user profiles. If the site is not managed by WP Toolkit, or if the old address has been retained elsewhere, replace it using the wp search-replace command.
Other website platforms. For websites built using Joomla, PrestaShop, Drupal or a custom-developed site, the website address is stored in the configuration file or the database and must be edited manually.
Redirects. Check the Redirects page in the Domains group: the targets of existing redirects still point to the old domain.
SSL certificate. On the SSL/TLS Certificates page in the Security section, check the Status tab to see whether the new domain has received the certificate. If the domain was not yet pointing to the hosting service at the time of the name change, AutoSSL will issue the certificate once the DNS settings have been configured; if this fails, the article on AutoSSL errors will help.
Your old domain. If you are keeping your old domain, it is worth adding it back to your account as an alias domain and setting up a 301 redirect to the new domain. This ensures that old links, search engine results and emails sent to the old address are not lost. You can also notify the search engine of the migration using the Google Search Console’s change of address tool.
Client Portal. Please notify our support team via a ticket that you are changing your domain, so that the new domain is also listed in your hosting details on the client portal.
Can I change the name back?
Yes, the same way: the domain can be renamed back to the old one through Manage › Rename. In our test, after renaming it back, the email accounts, forwarders, DNS records and the WordPress address were restored, and AutoSSL issued the certificates again. The DKIM key, however, had to be regenerated after the rename back as well. Mail sent to the old address in the meantime is lost, so do not use this “just to try”.